

Setting up VSTS CI/CD for a SPA app using AngularCLI, ASPNetCore (Part 1)
 April 27, 2017
 4 min read
Recently I was assigned to a green field project where we had to create an initial structure of a project which was going to be written in Angular 2 using Angular CLI for front end side and ASP.Net Core for back-end.
We had to use VSTS (Visual Studio Team Services) as our source control and build and deployment pipeline. The result was then deployed to Azure Web Apps and the aim was to make this happen.
After some digging and trying the new version of Visual Studio 2017 and setting the initial build steps, I found out that VSTS does not support the csproj files yet. Therefore, I had to go back and use visual studio 2015 with project.json file.
On the other hand since we were using Angular CLI we couldn’t merge it easily in one project with our ASP.Net Core project since it hides the actual webpack config file.
At least it wasn’t something we could do quickly and we had to prepare a POC to get a taste of what was going to happen in the product.
So I started googling and found a good article from Jürgen Gutsch showing how to simply merge them using two different projects and a simple front end build before building the web app.
I won’t go into too much details here, but basically you would build the Angular project and modify the config to write the output files into wwwroot folder. Yes I know, simple.

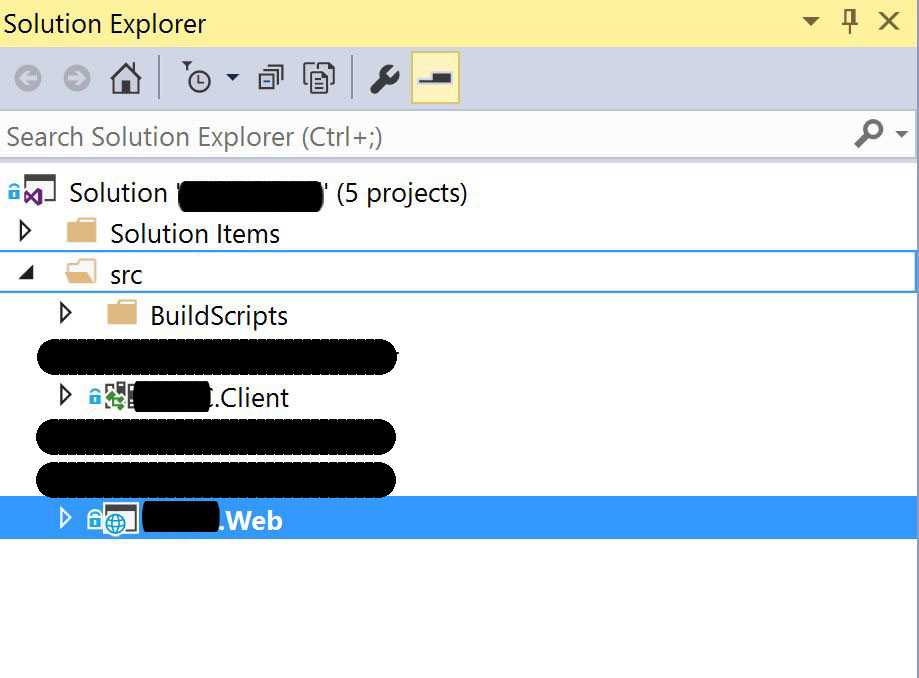
By now your project structure may be looking like this:
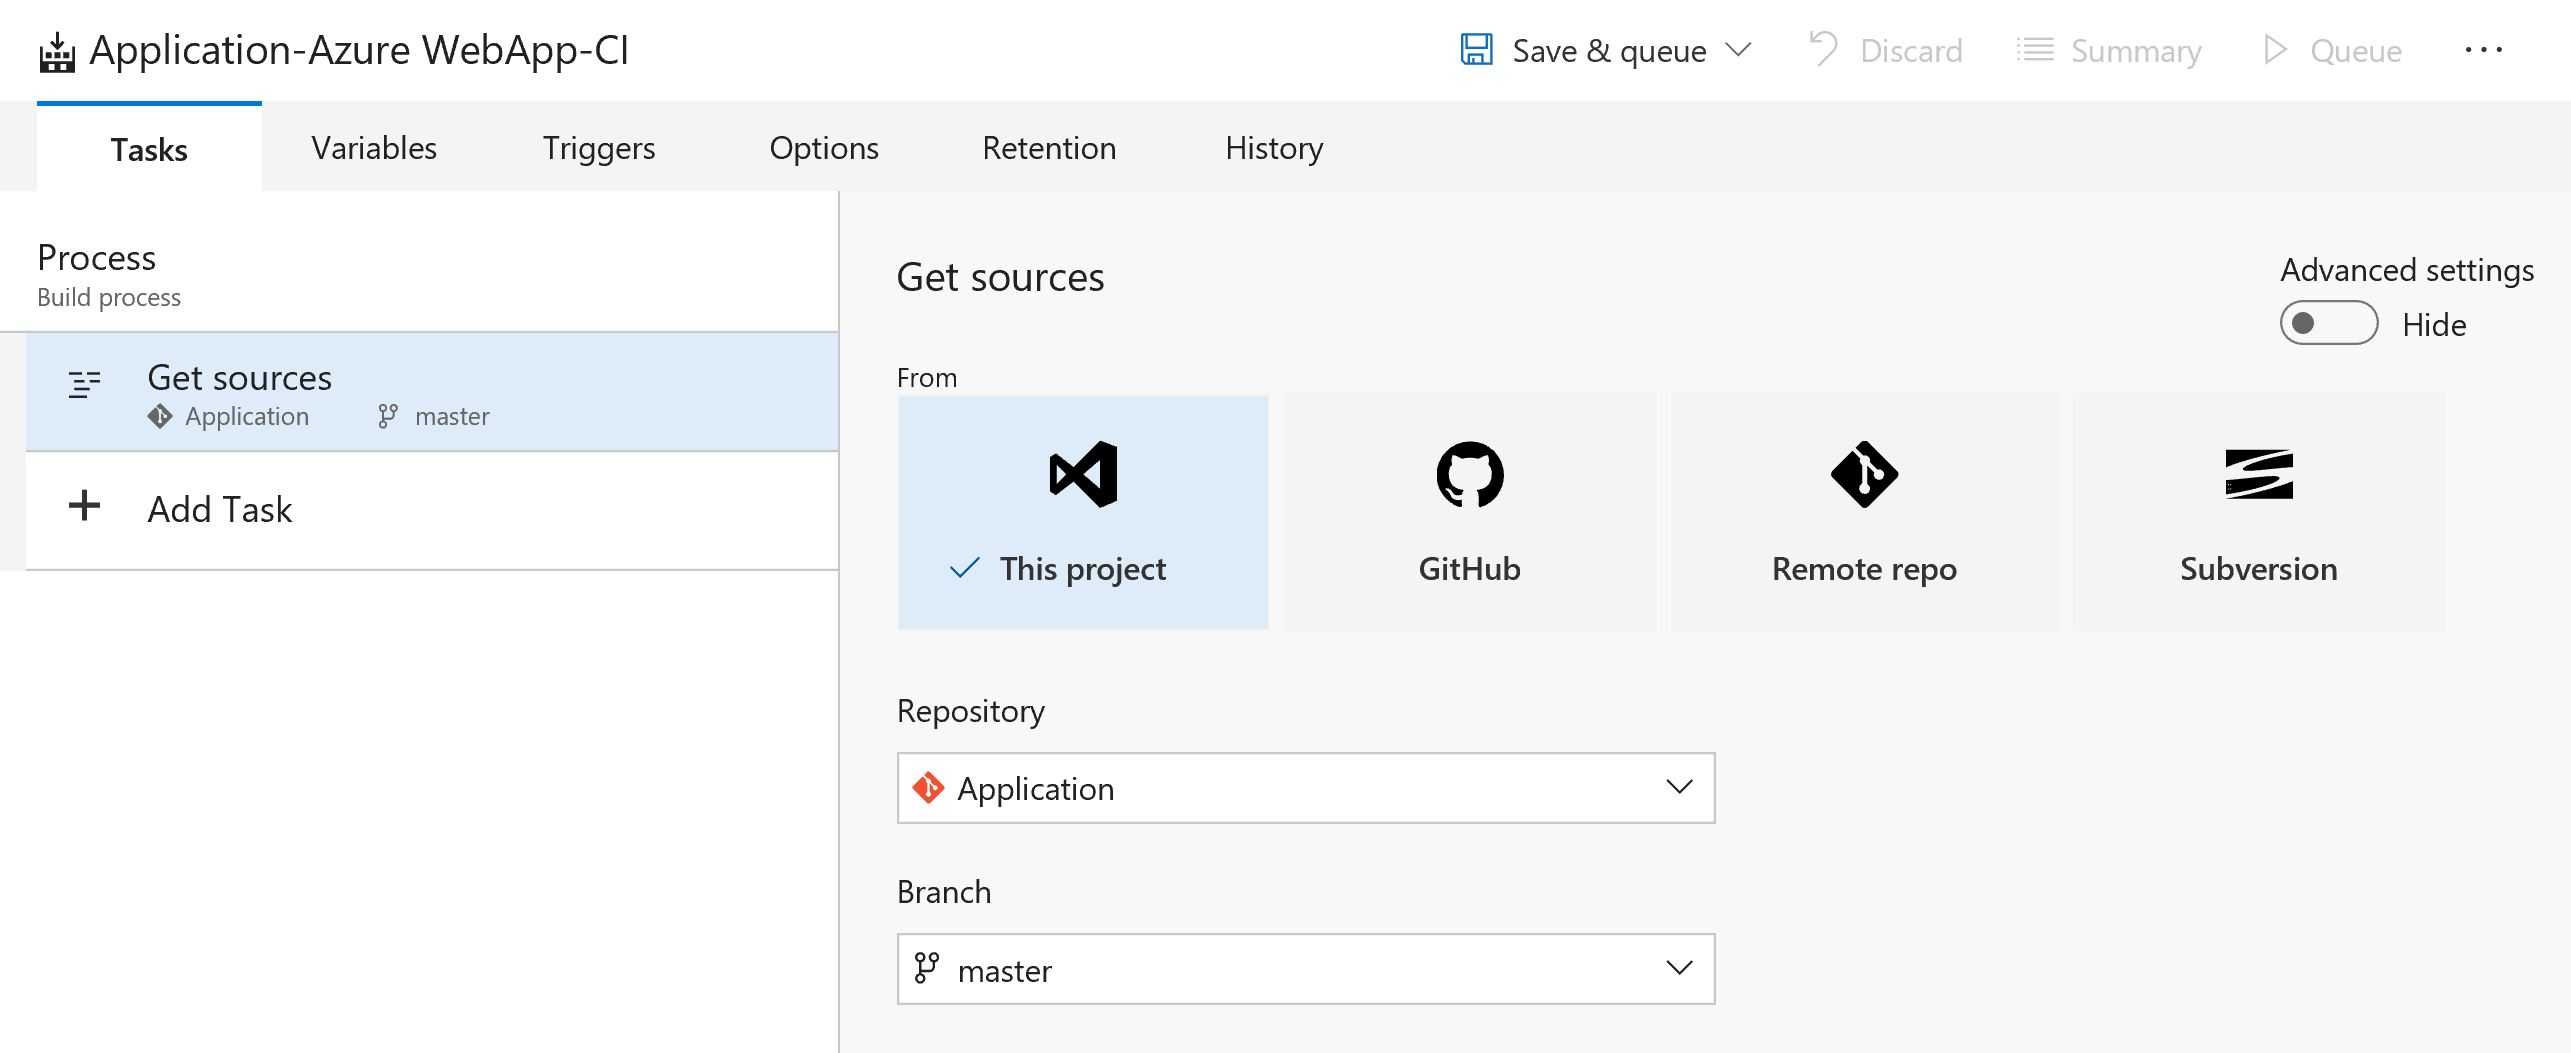
That done, I started to setup the VSTS build steps. Well that is very straight forward, you just have to give the steps the right order so start by create an empty build.
1. Get the source code
The very first step is to get the source from source control. Define your repository and the branch you are working on.
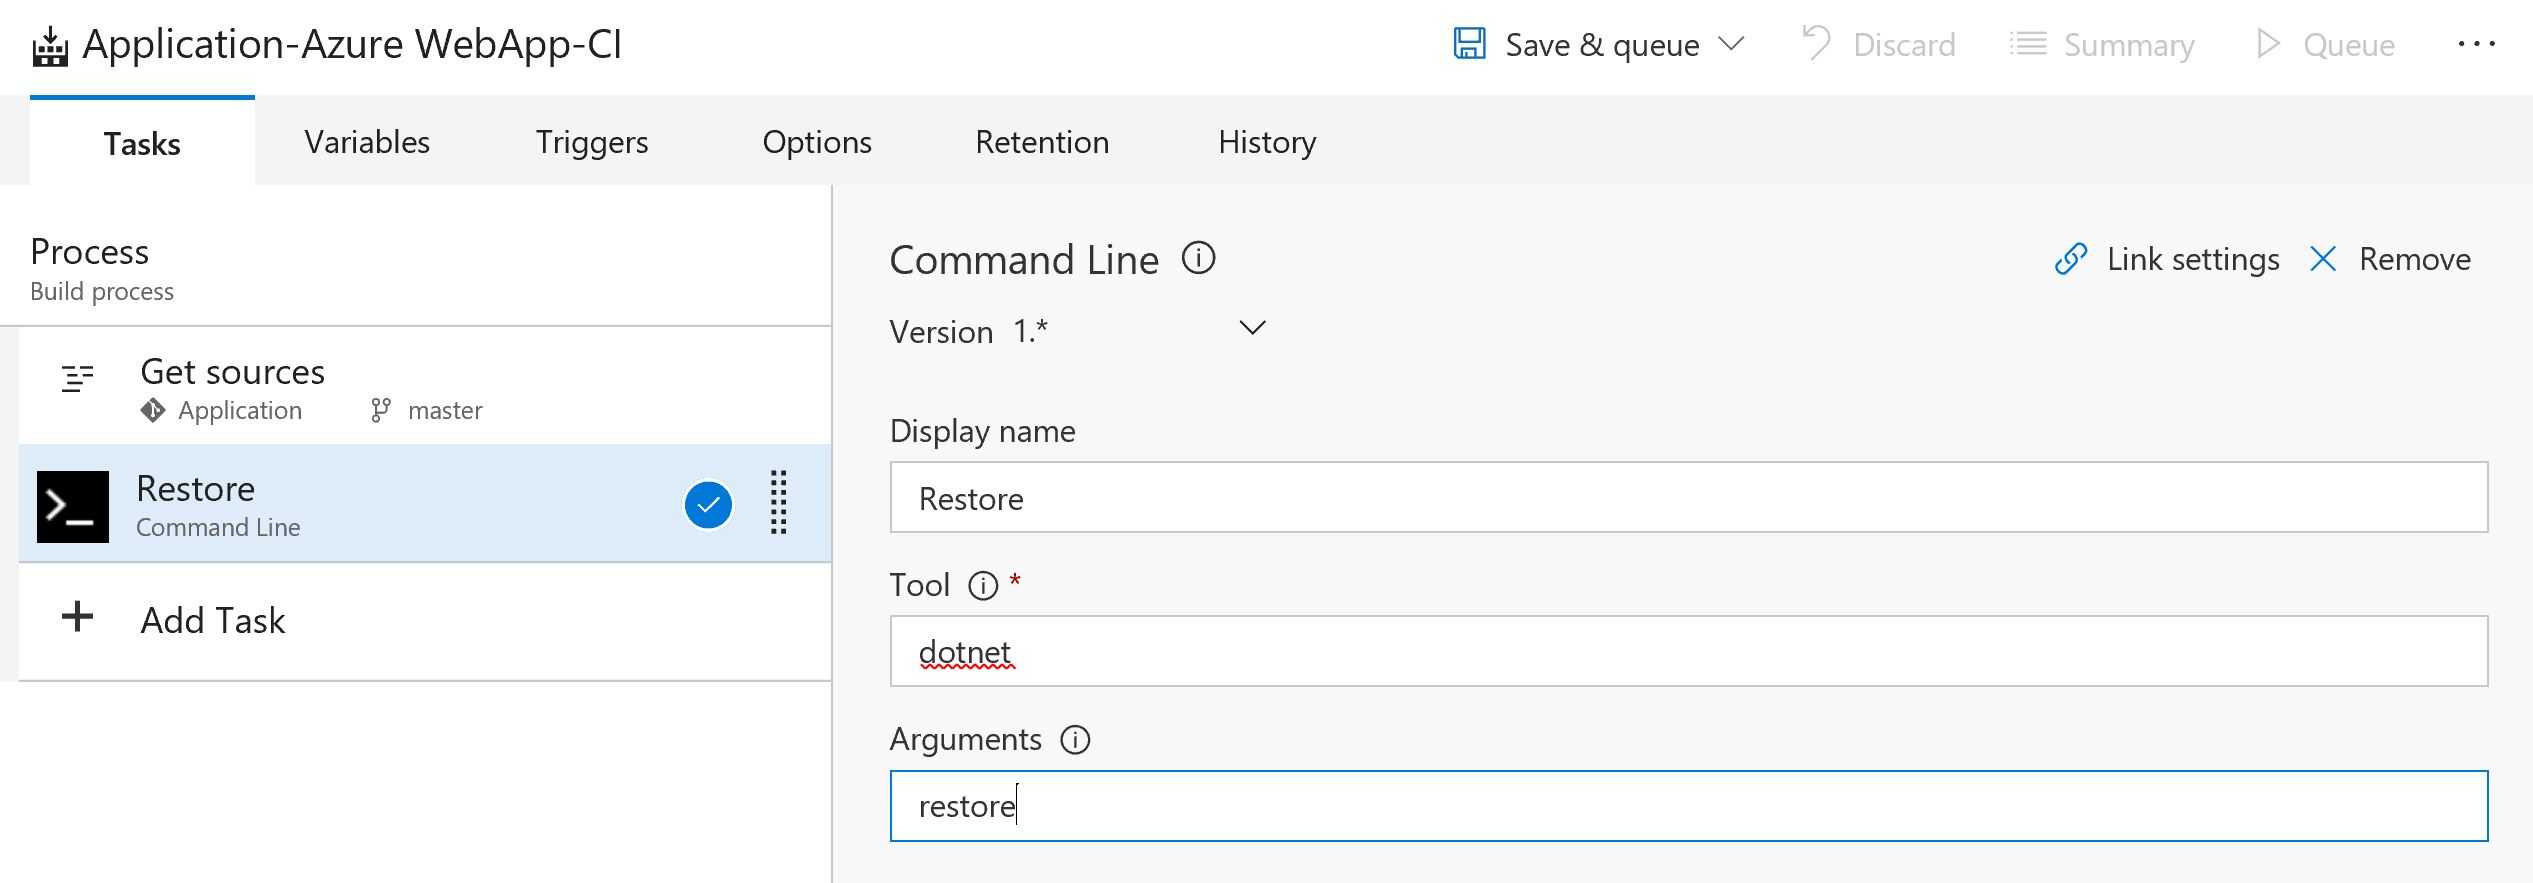
2. Restore dot net packages
Add a command line task and name it restore (you can call it something else this is just to make each step clear). Then type dotnet in the tool text box and restore in the arguments.
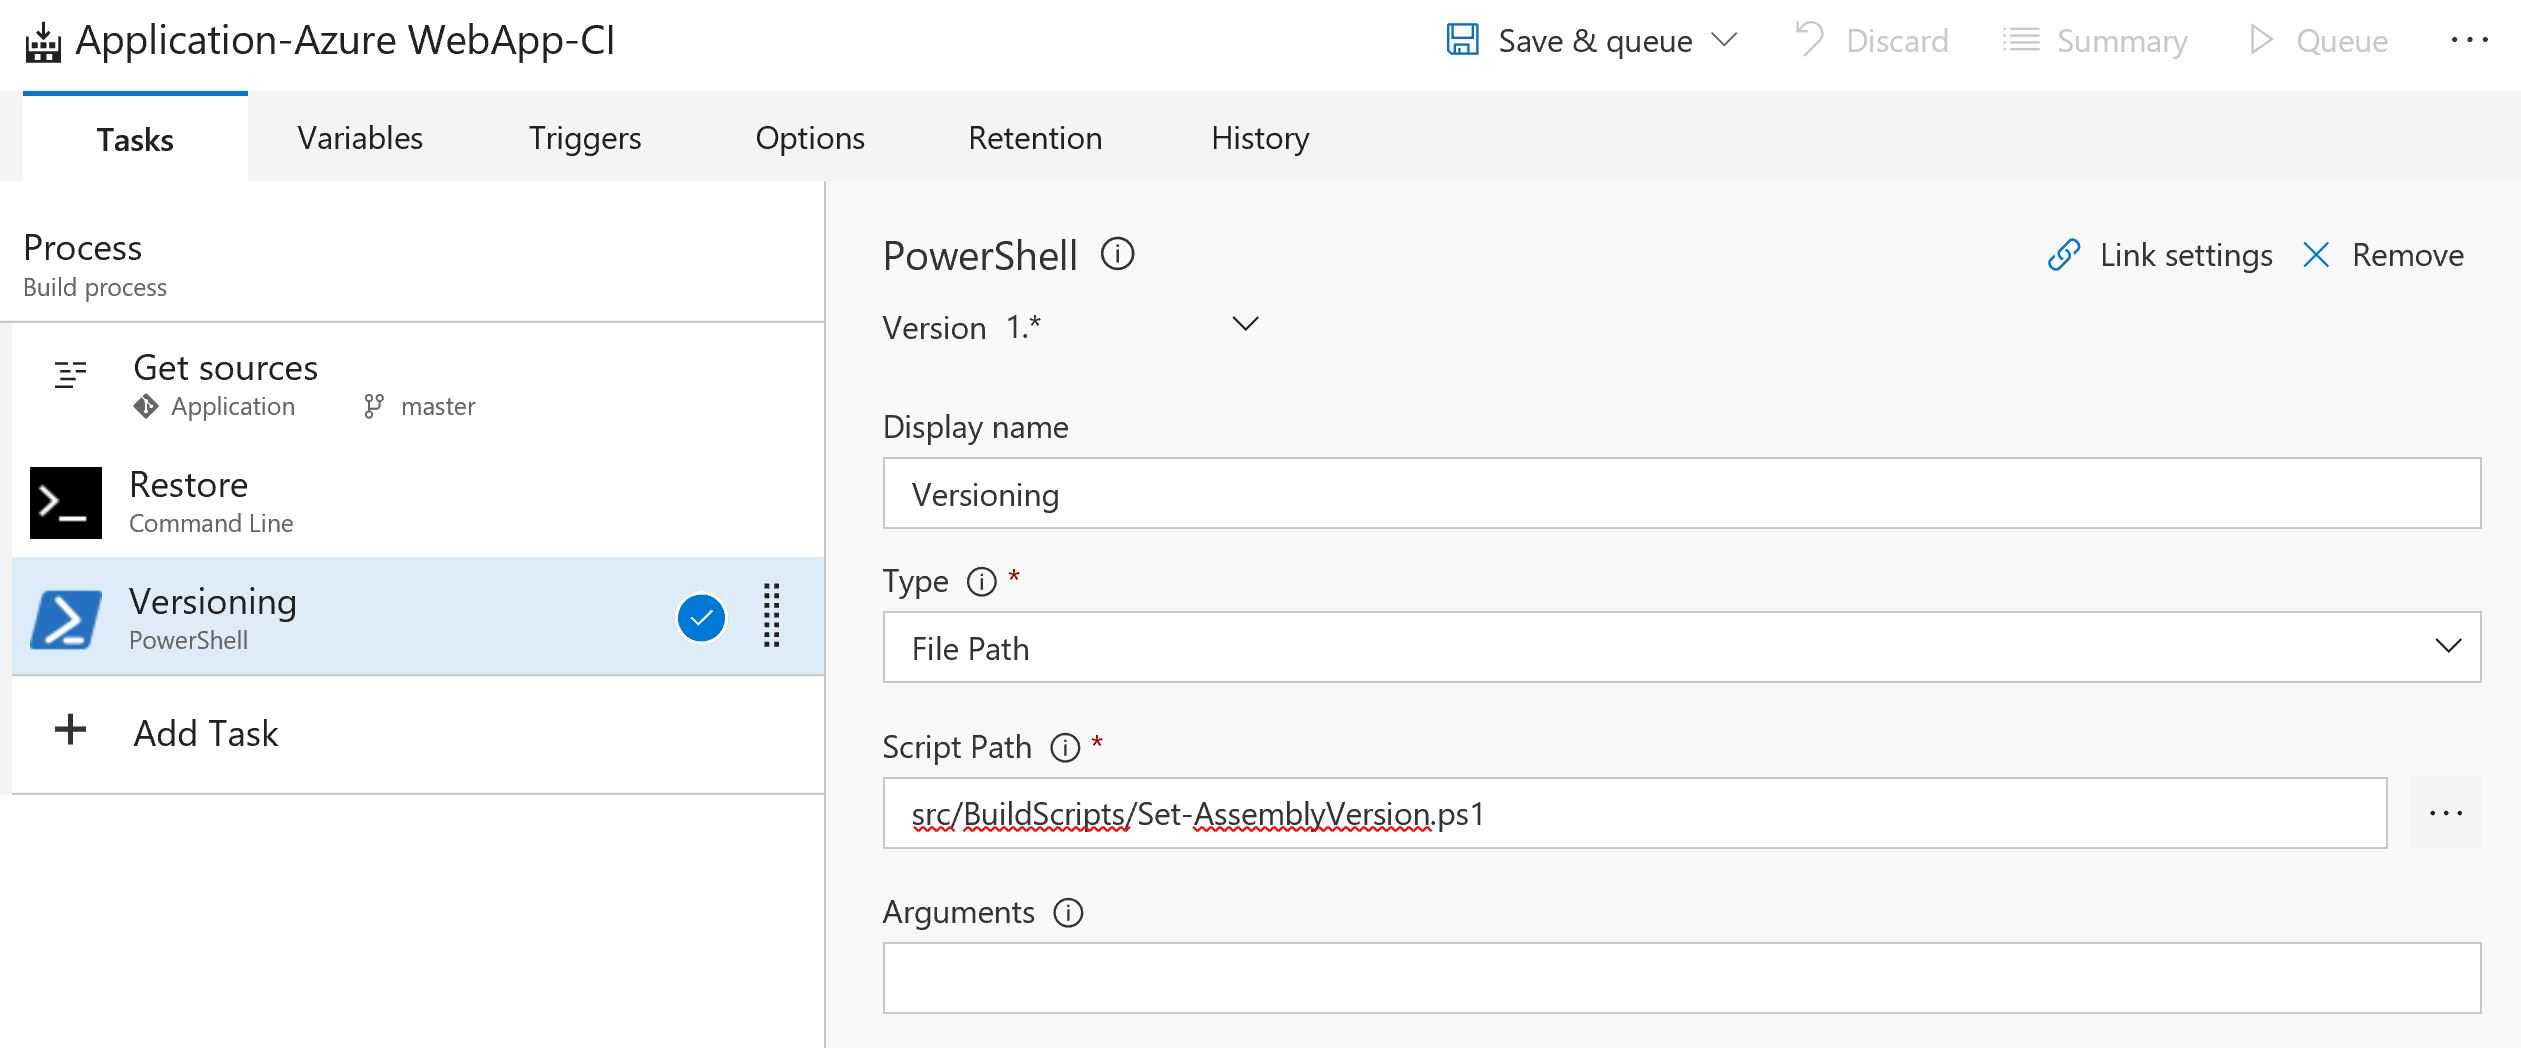
3. Versioning if intended
If you care about versioning this is the time for it. What we chose to follow was SemVer so we put the major and minor numbers in project.json and got the rest from date and revision.
Then all we had to do was to create a PowerShell script which extracted those and put them together to form the complete version and set it in project.json and AssemblyInfo files.
The PowerShell script would as simple as:
Write-Output "Getting version from Build number"

$jsonpath = "$Env:WebSourceFolder\project.json"
$json = Get-Content -Path $jsonpath -Raw | ConvertFrom-Json -ErrorAction Ignore

$BuildVersion = [regex]::matches($Env:BUILD_BUILDNUMBER, "\d+\.\d+")

Write-Output "Build Version extracted => $BuildVersion"

$Version = $json.version + "." + $BuildVersion

Write-Output "App Version constructed => $Version"

$json.version = $Version

$json | ConvertTo-Json -depth 100 | Out-File $jsonpath

Write-Output "Applied Version"</pre>
4. Run the versioning script in build
As you can see we are extracting the major and minor from project.json and date and revision from build number. In order to set that in the first place you need to define the build output format as follow in the options tab of the build:
$(BuildDefinitionName)_$(Year:yy)$(DayOfYear)$(rev:.rr)Now you can create a PowerShell task and run this script and name it versioning. Leave the type to “File Path” and write the script path inside its box.
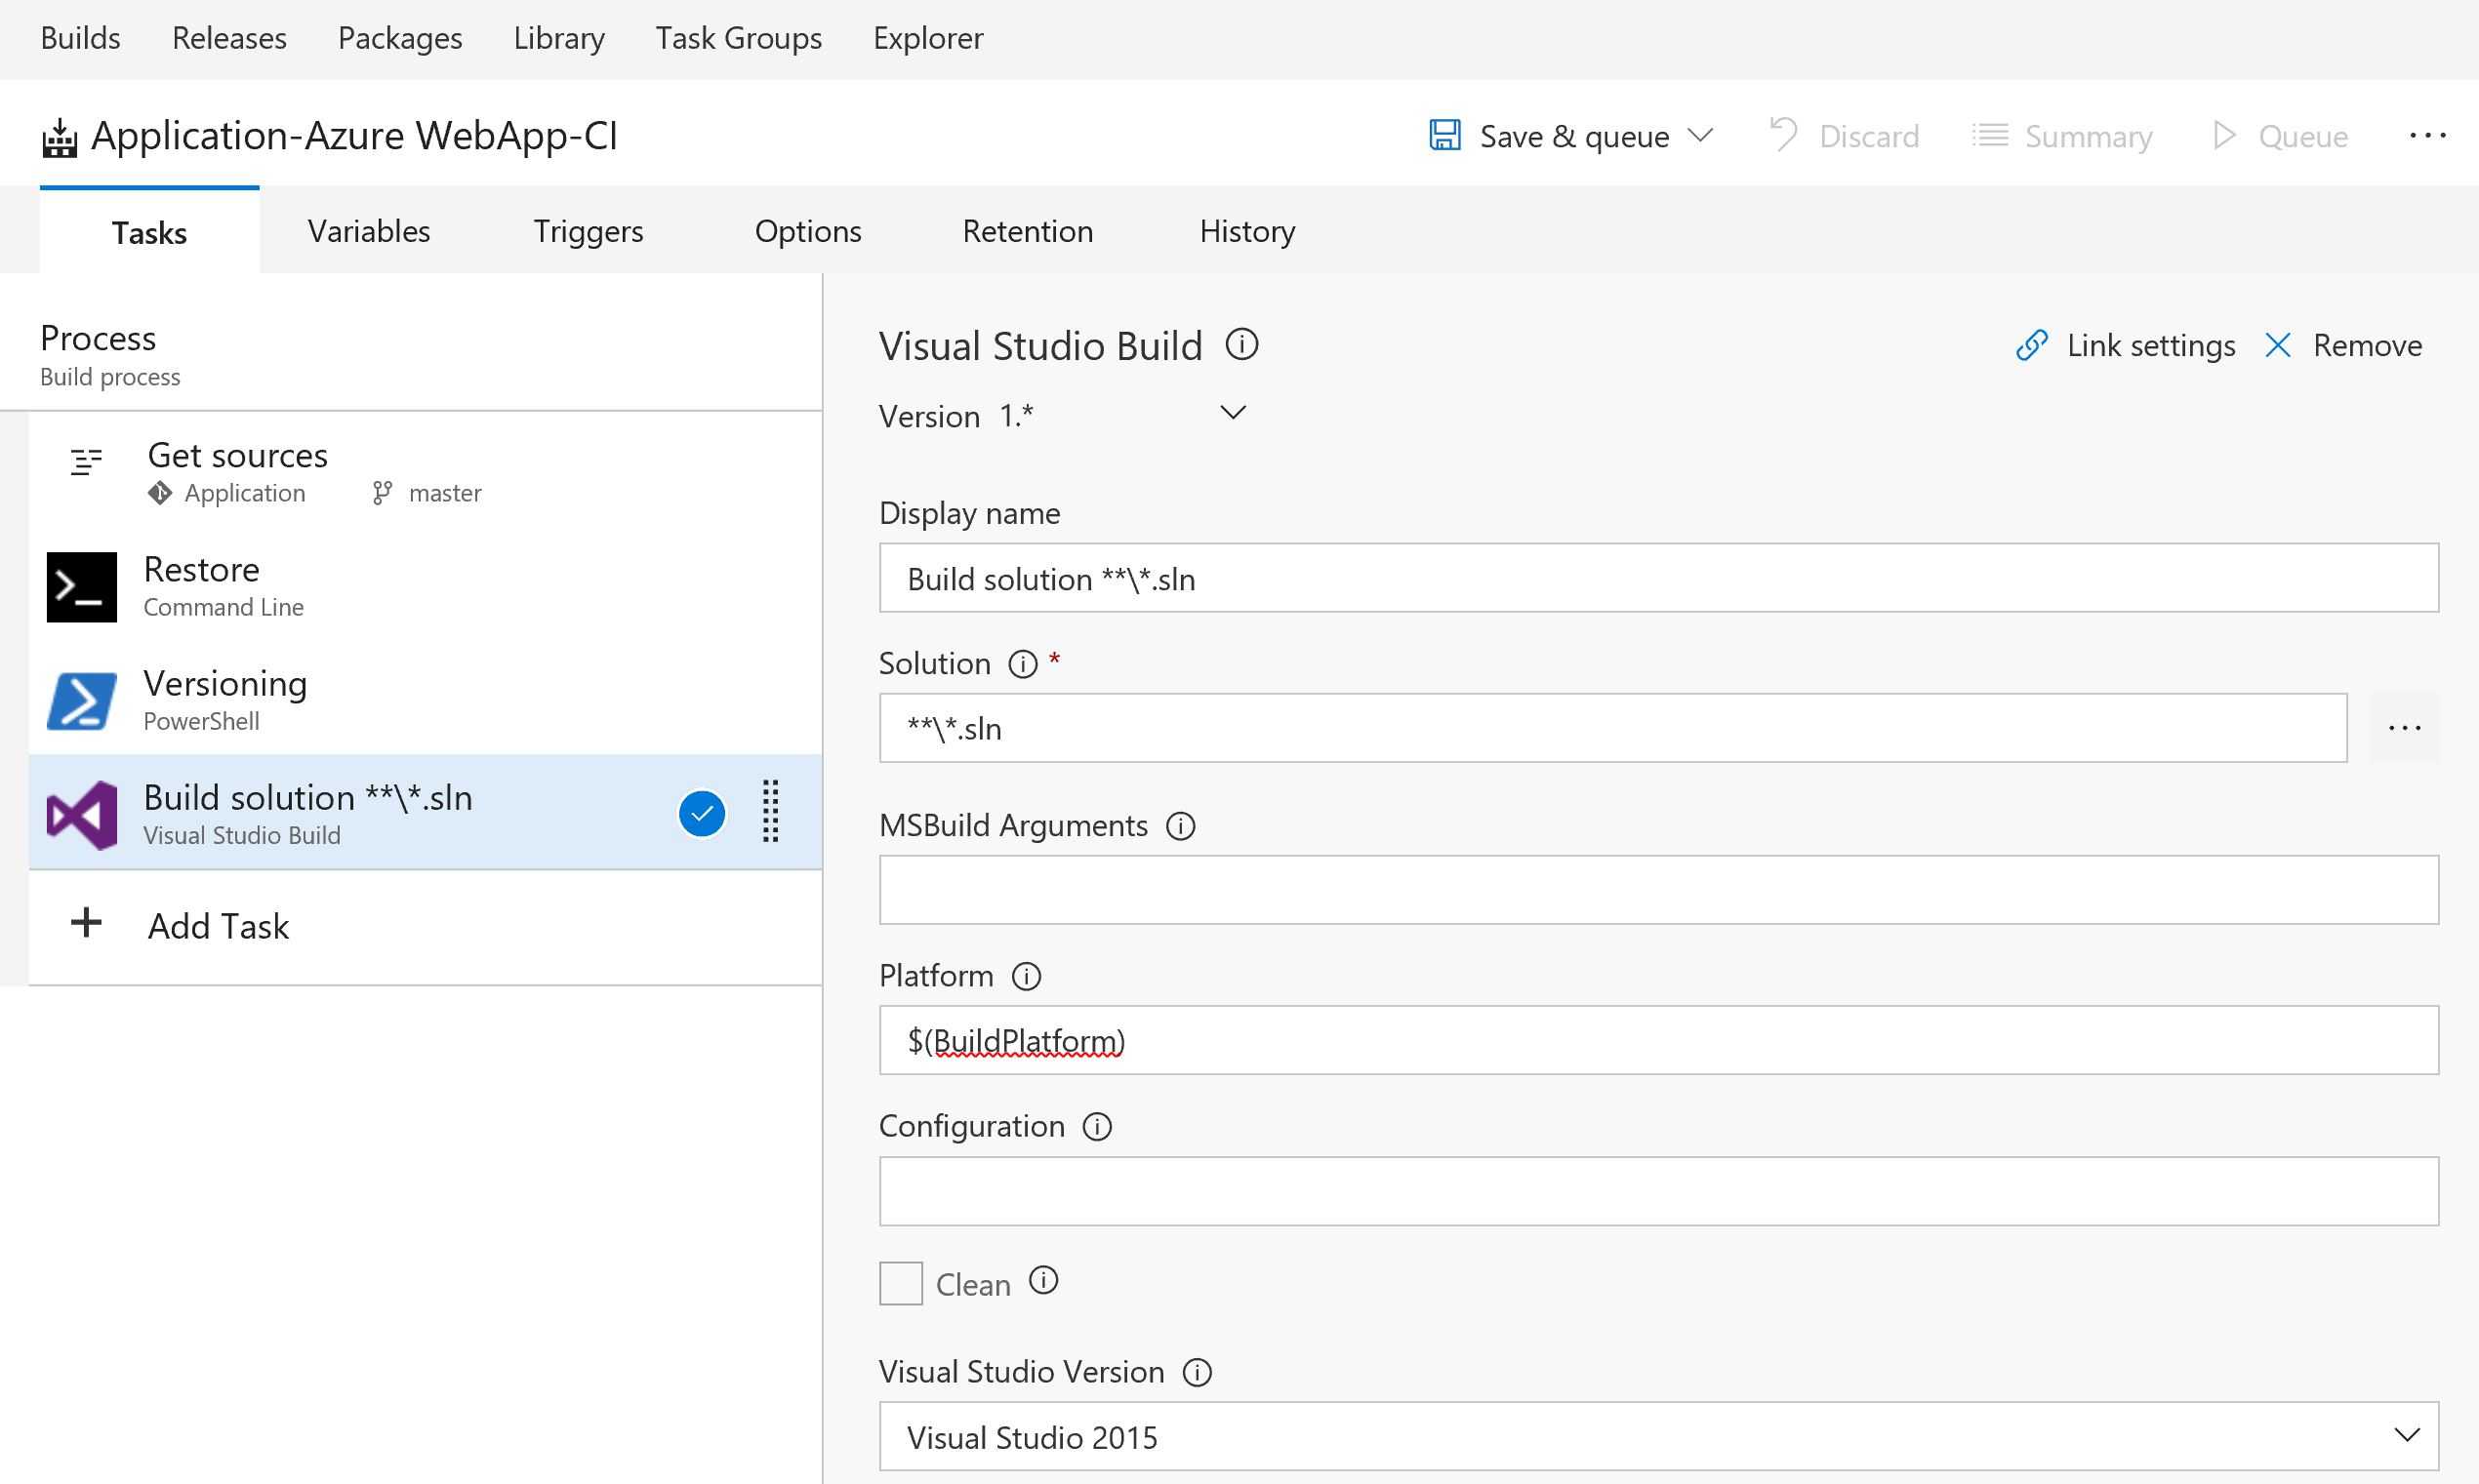
5. Building the solution
Time to build the solution. Create a “Visual Studio Build” task and write the solution file’s path (leave it as default which usually works), then $(BuildPlatform) in the platform box. Don’t forget to change the Visual Studio version to 2015, otherwise your build will fail.
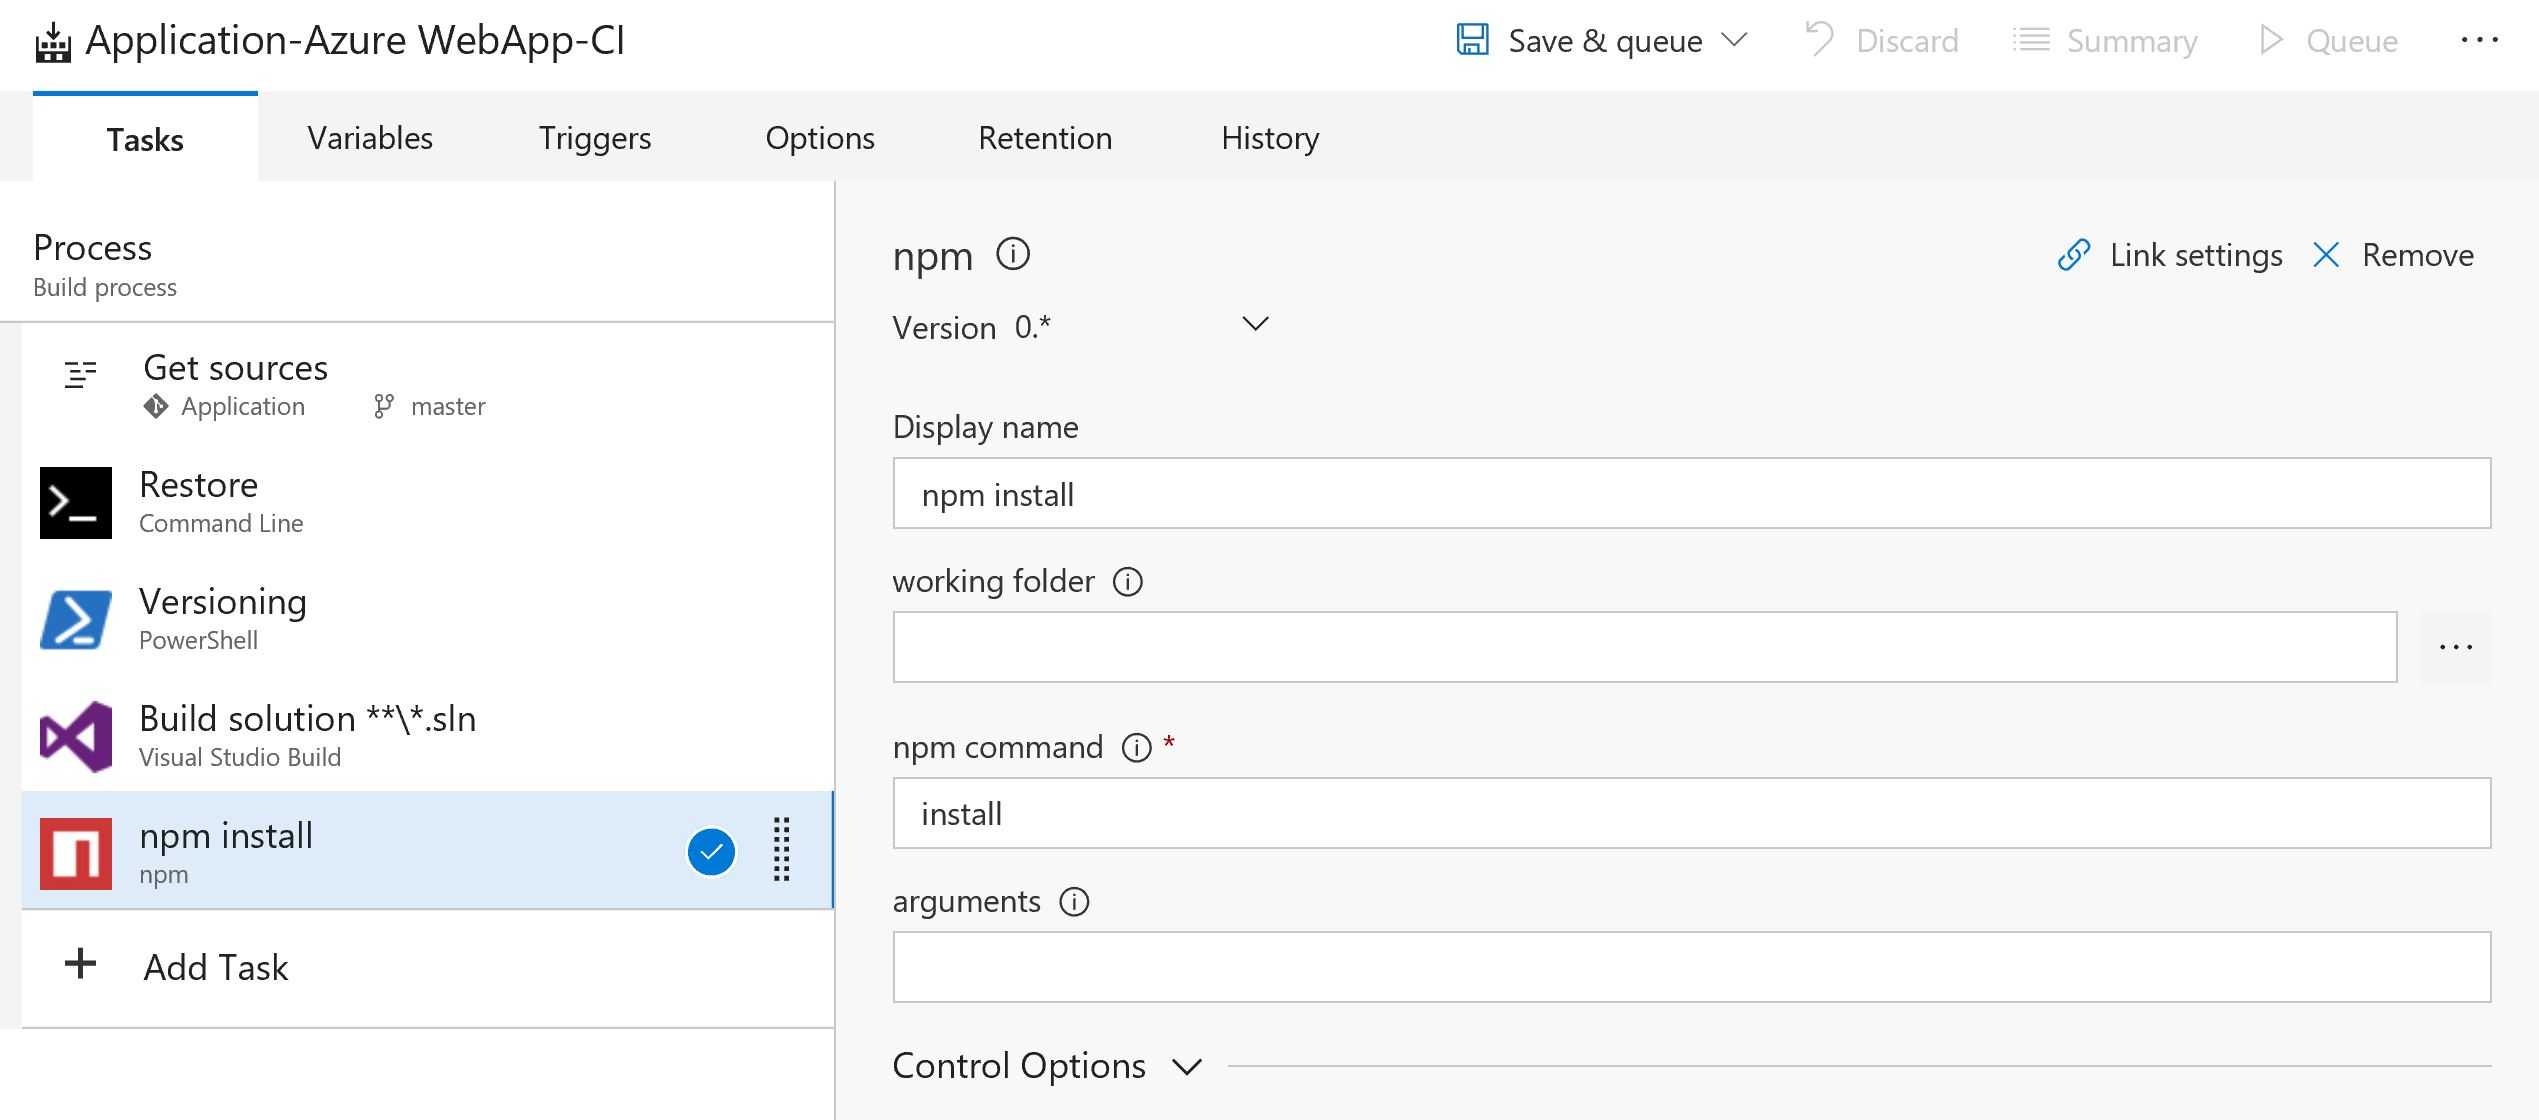
6. Installing npm packages
Ok we’re now done with server side steps apart from any possible tests. Time to build our client side app for which first you should restore all of npm packages.
You can do this by creating a npm task which by default it will be prepared for install so leave the defaults as is. If there are any changes in future and you don’t see the command, just type install in the npm command box.
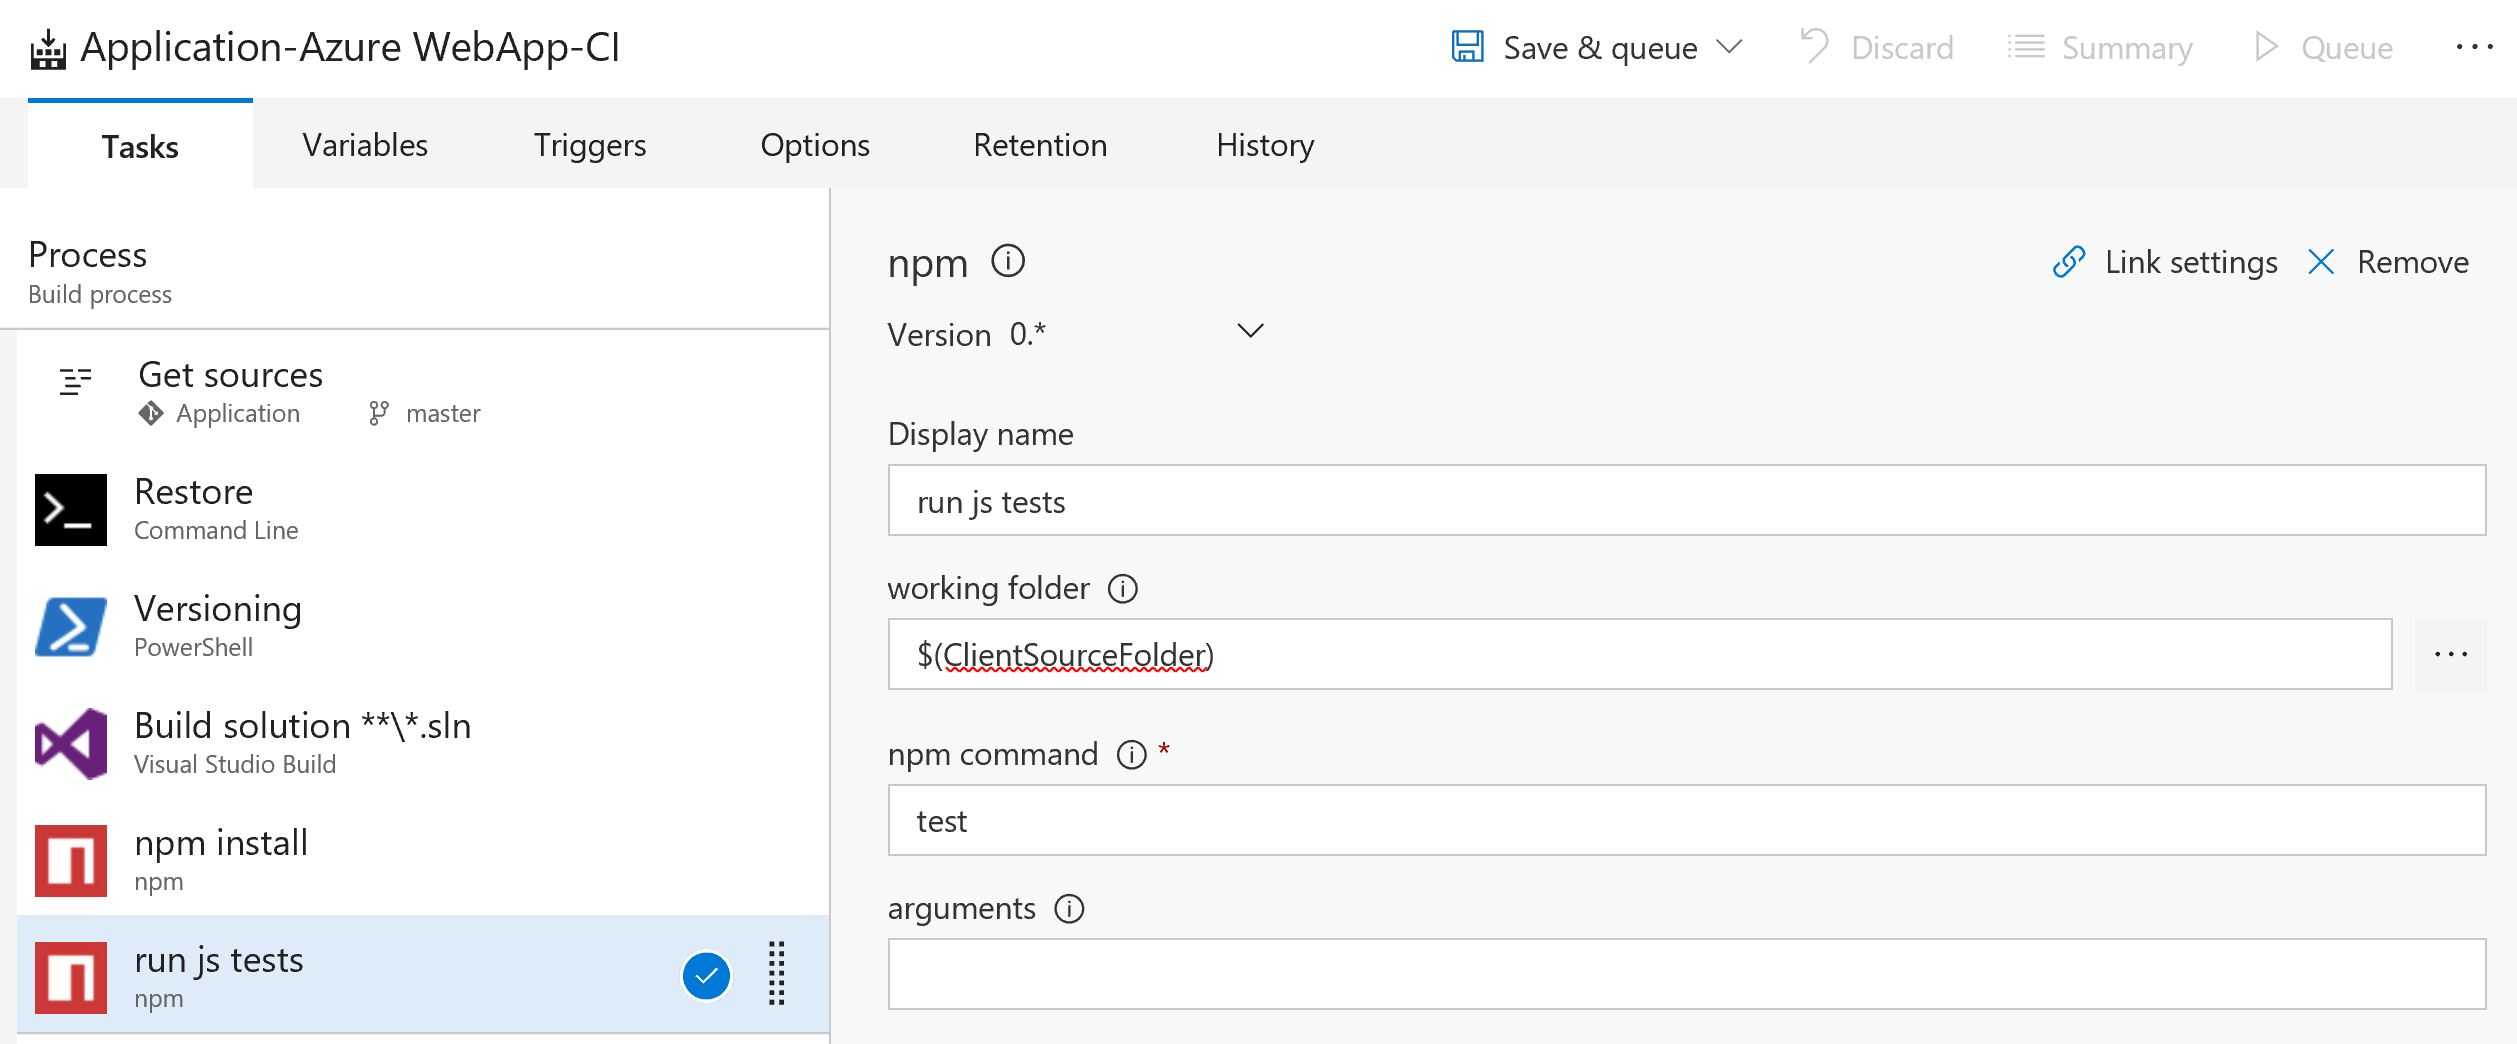
7. Run JS tests
If you have any JS tests this is the time to run them. By default the Angular CLI is setup in a way that the tests can be executed using npm test command. So create another npm task and call it “run js tests”.
The only thing to remember is that you have to set the working folder (I am using build variables but you can fully type that) correct, this is where you specify your Angular project root folder. Now the only thing left is to write test in the command box.
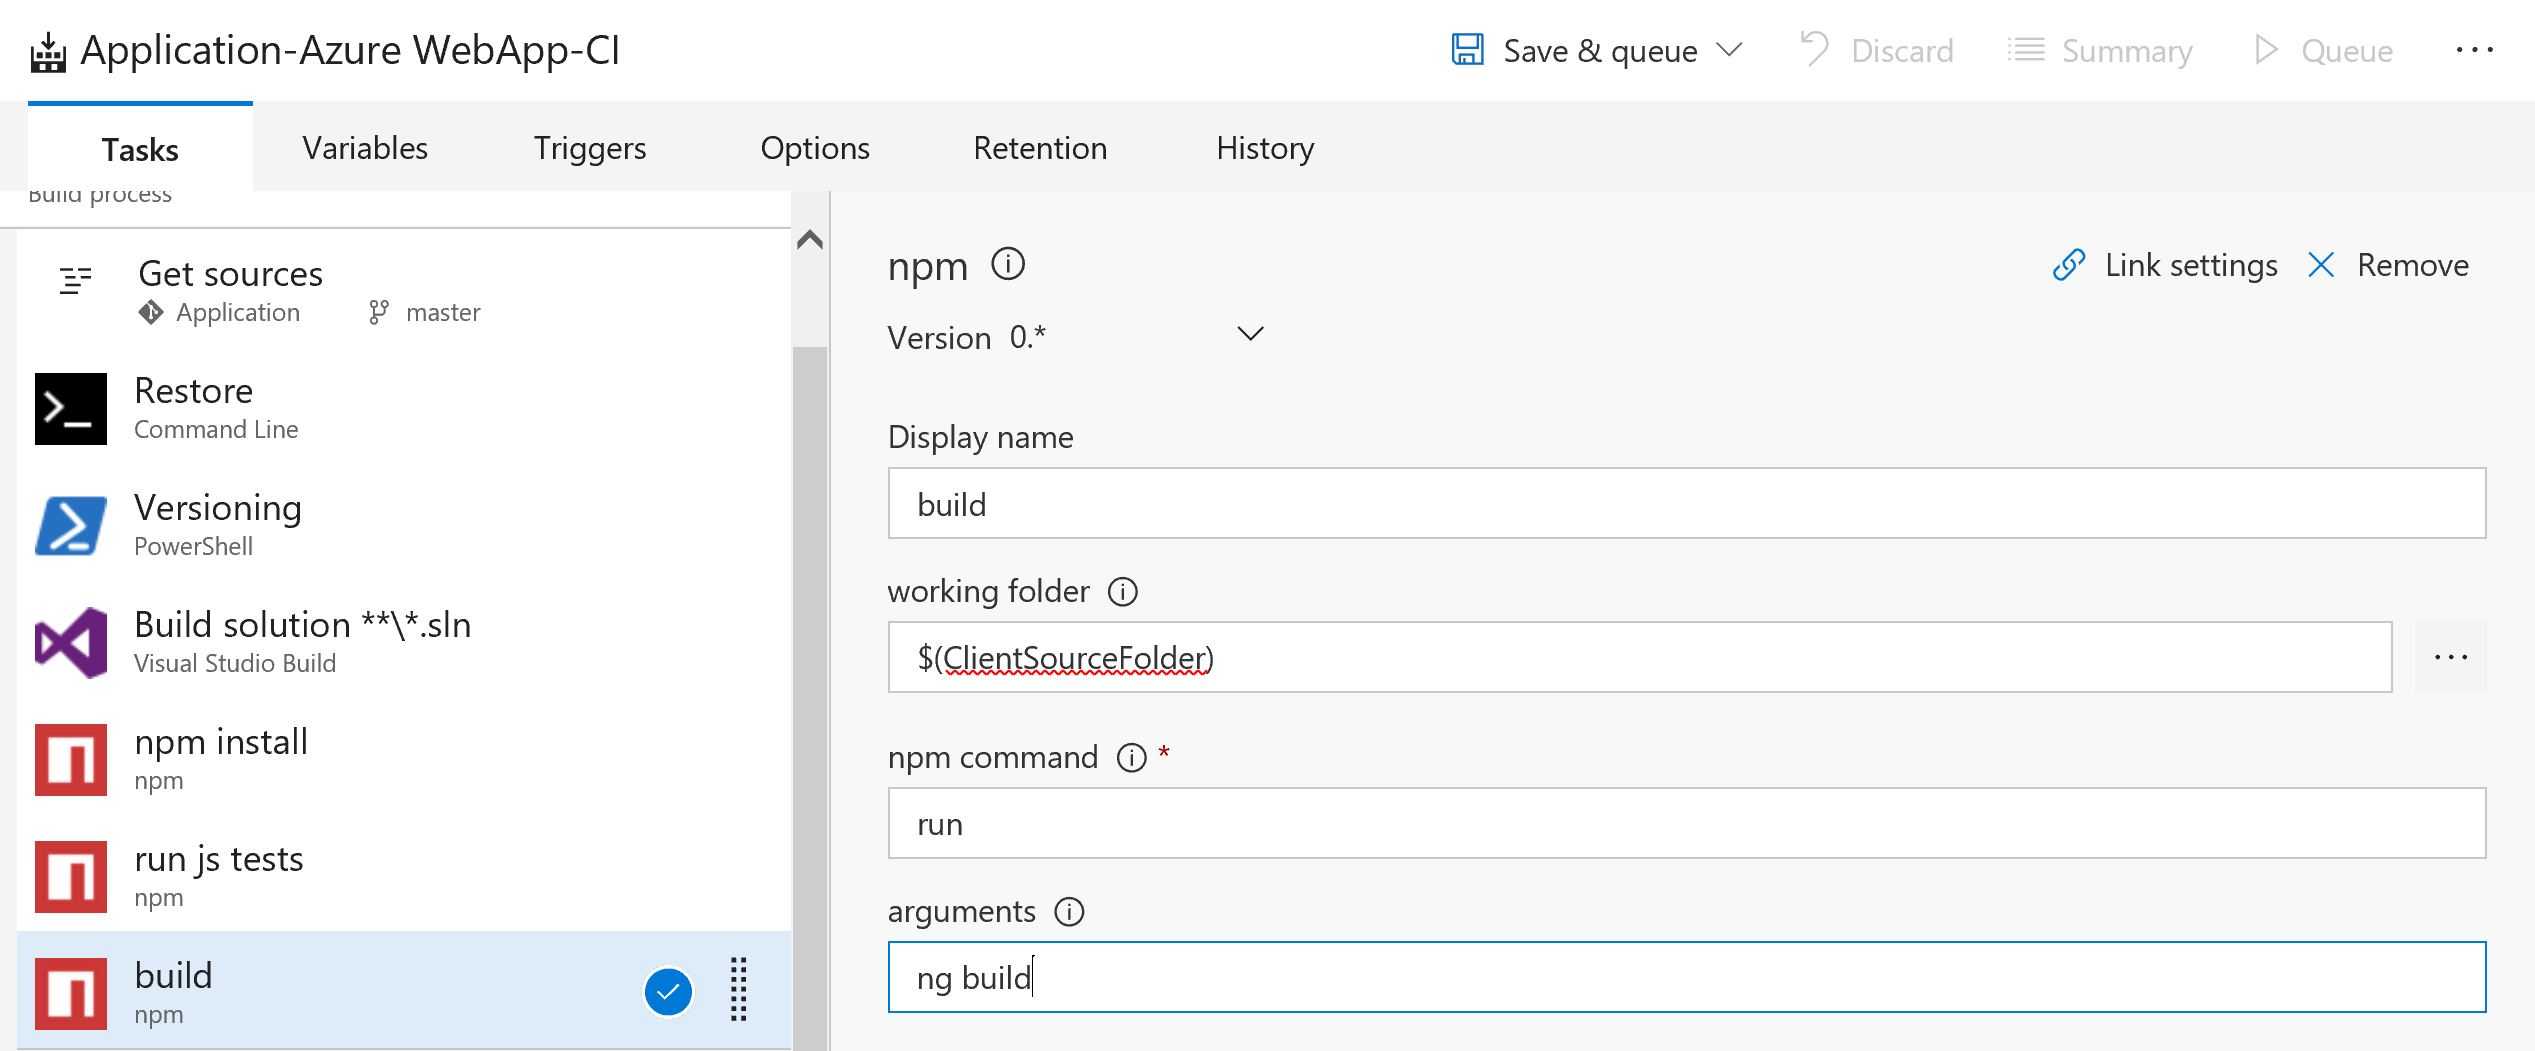
8. Build the client application
Time has come to build the Angular project. This can be done by running another npm task. You just have to make sure that you have already defined the ng command to run Angular CLI.
All you need to do now is to type run as command and then “ng build” as argument. This step is the key since it will build the client project, bundle everything and copy them into wwwroot folder of the web project.
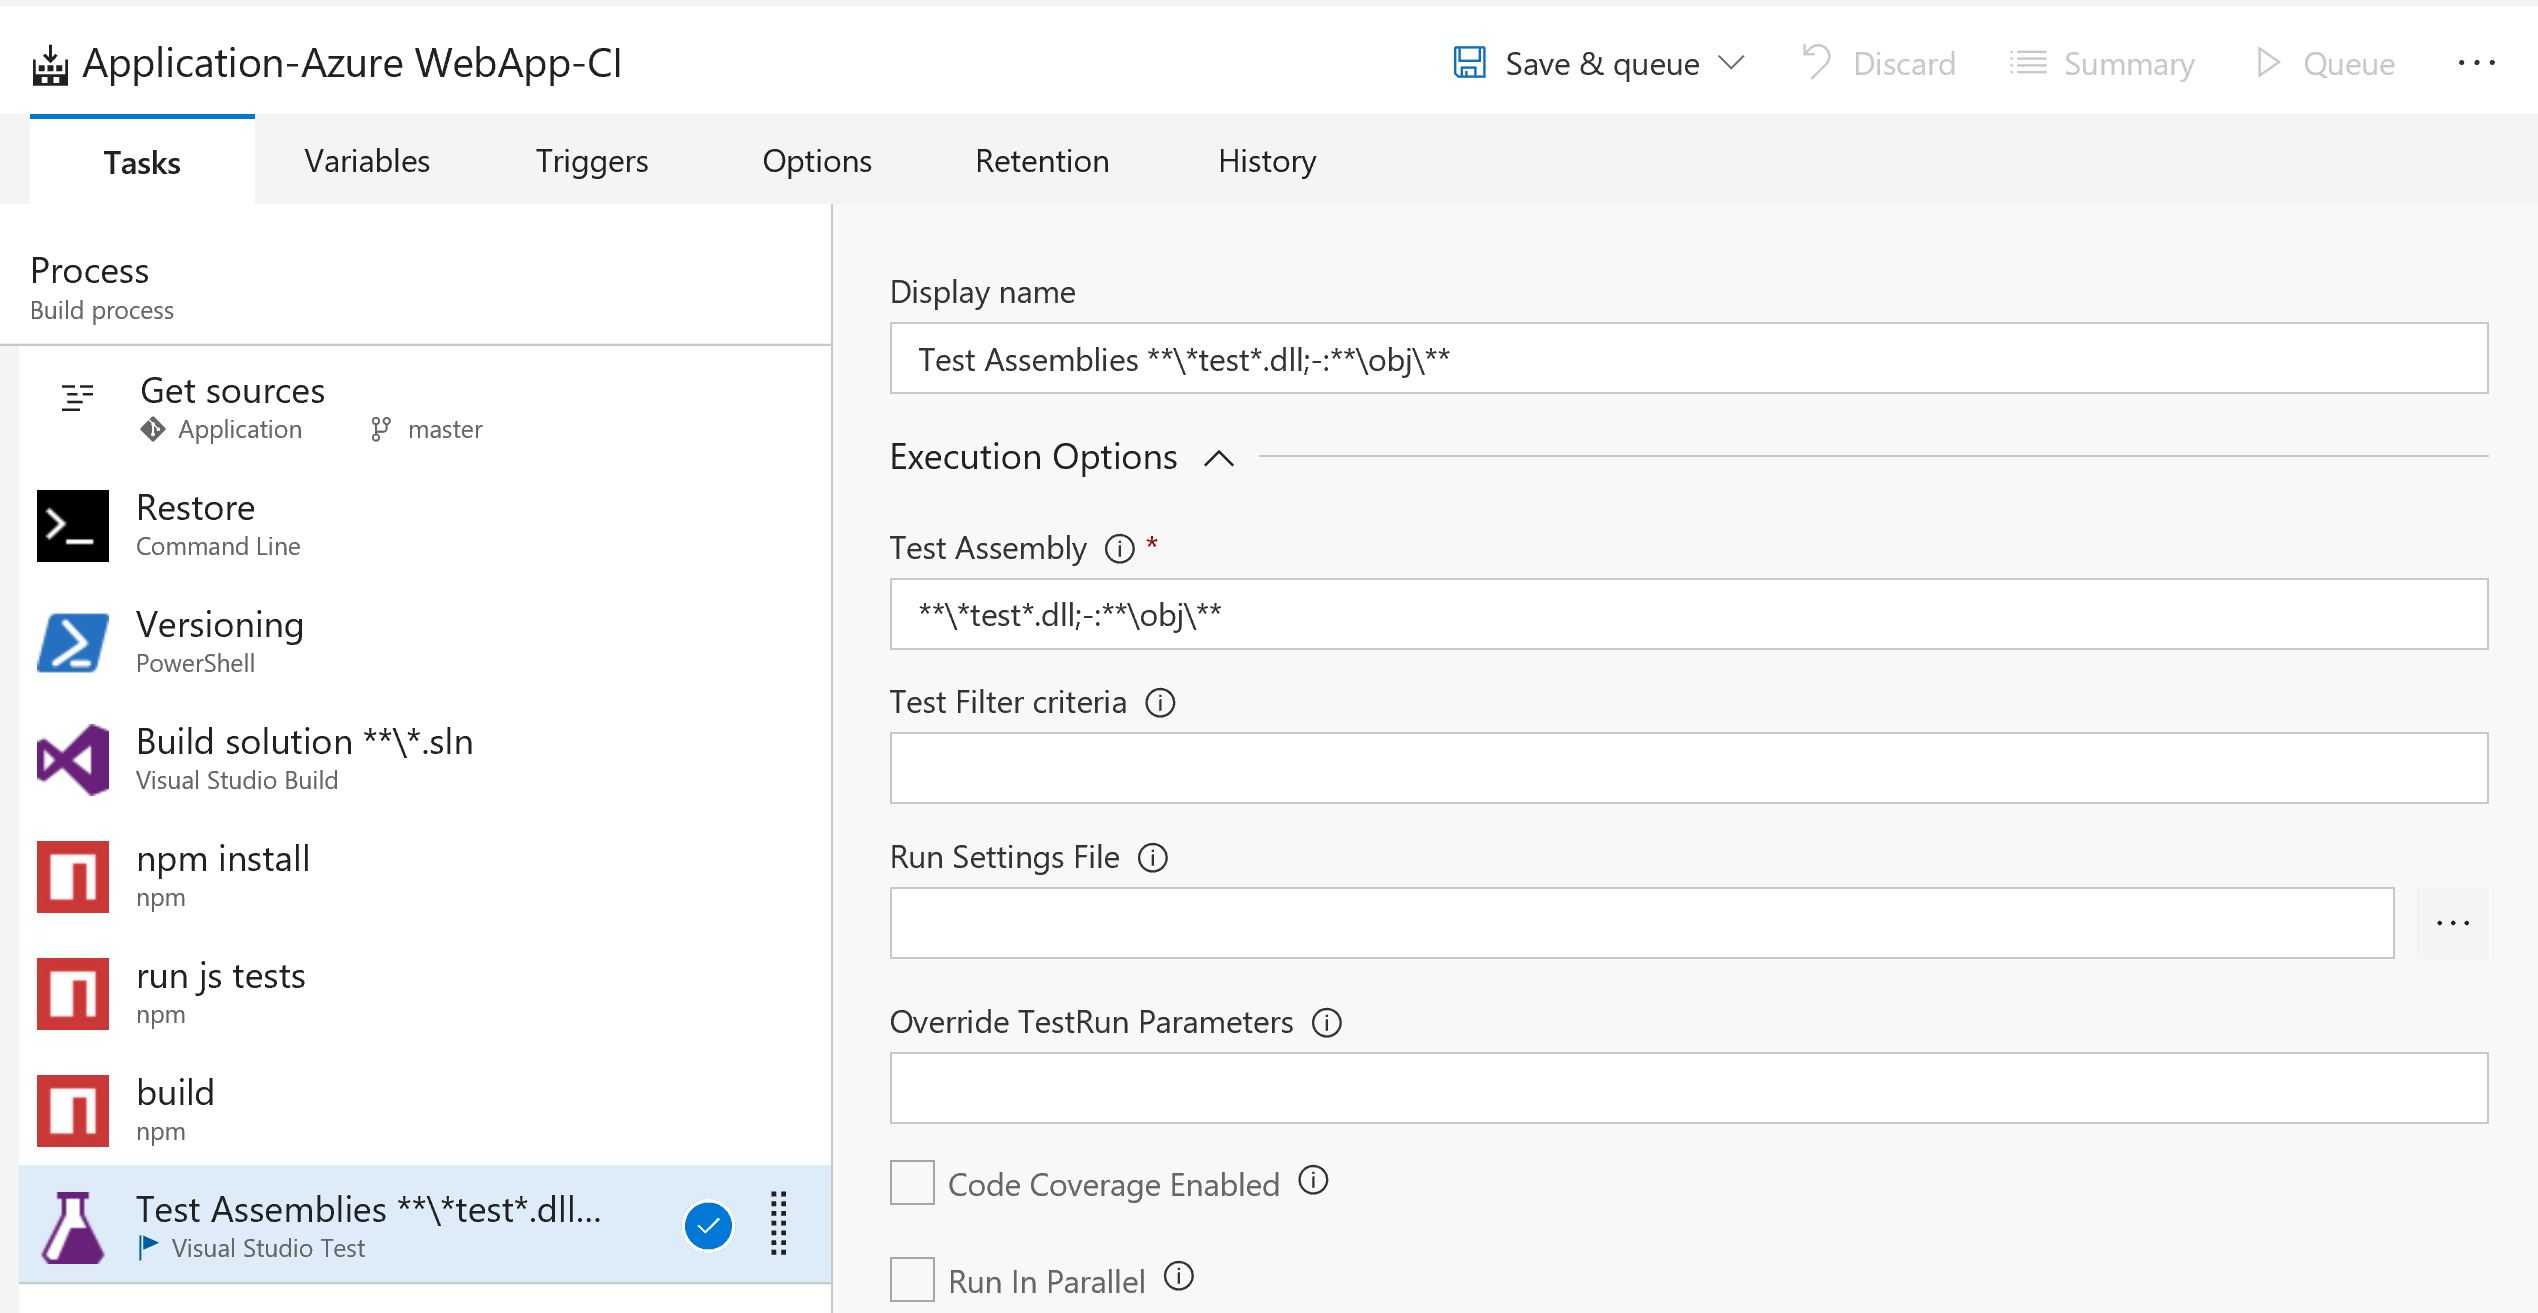
9. Run server side tests
Almost there. This is the time to run your server side tests. You can do that by creating a Visual Studio Test task. Default values will suffice unless you might want to customise them.
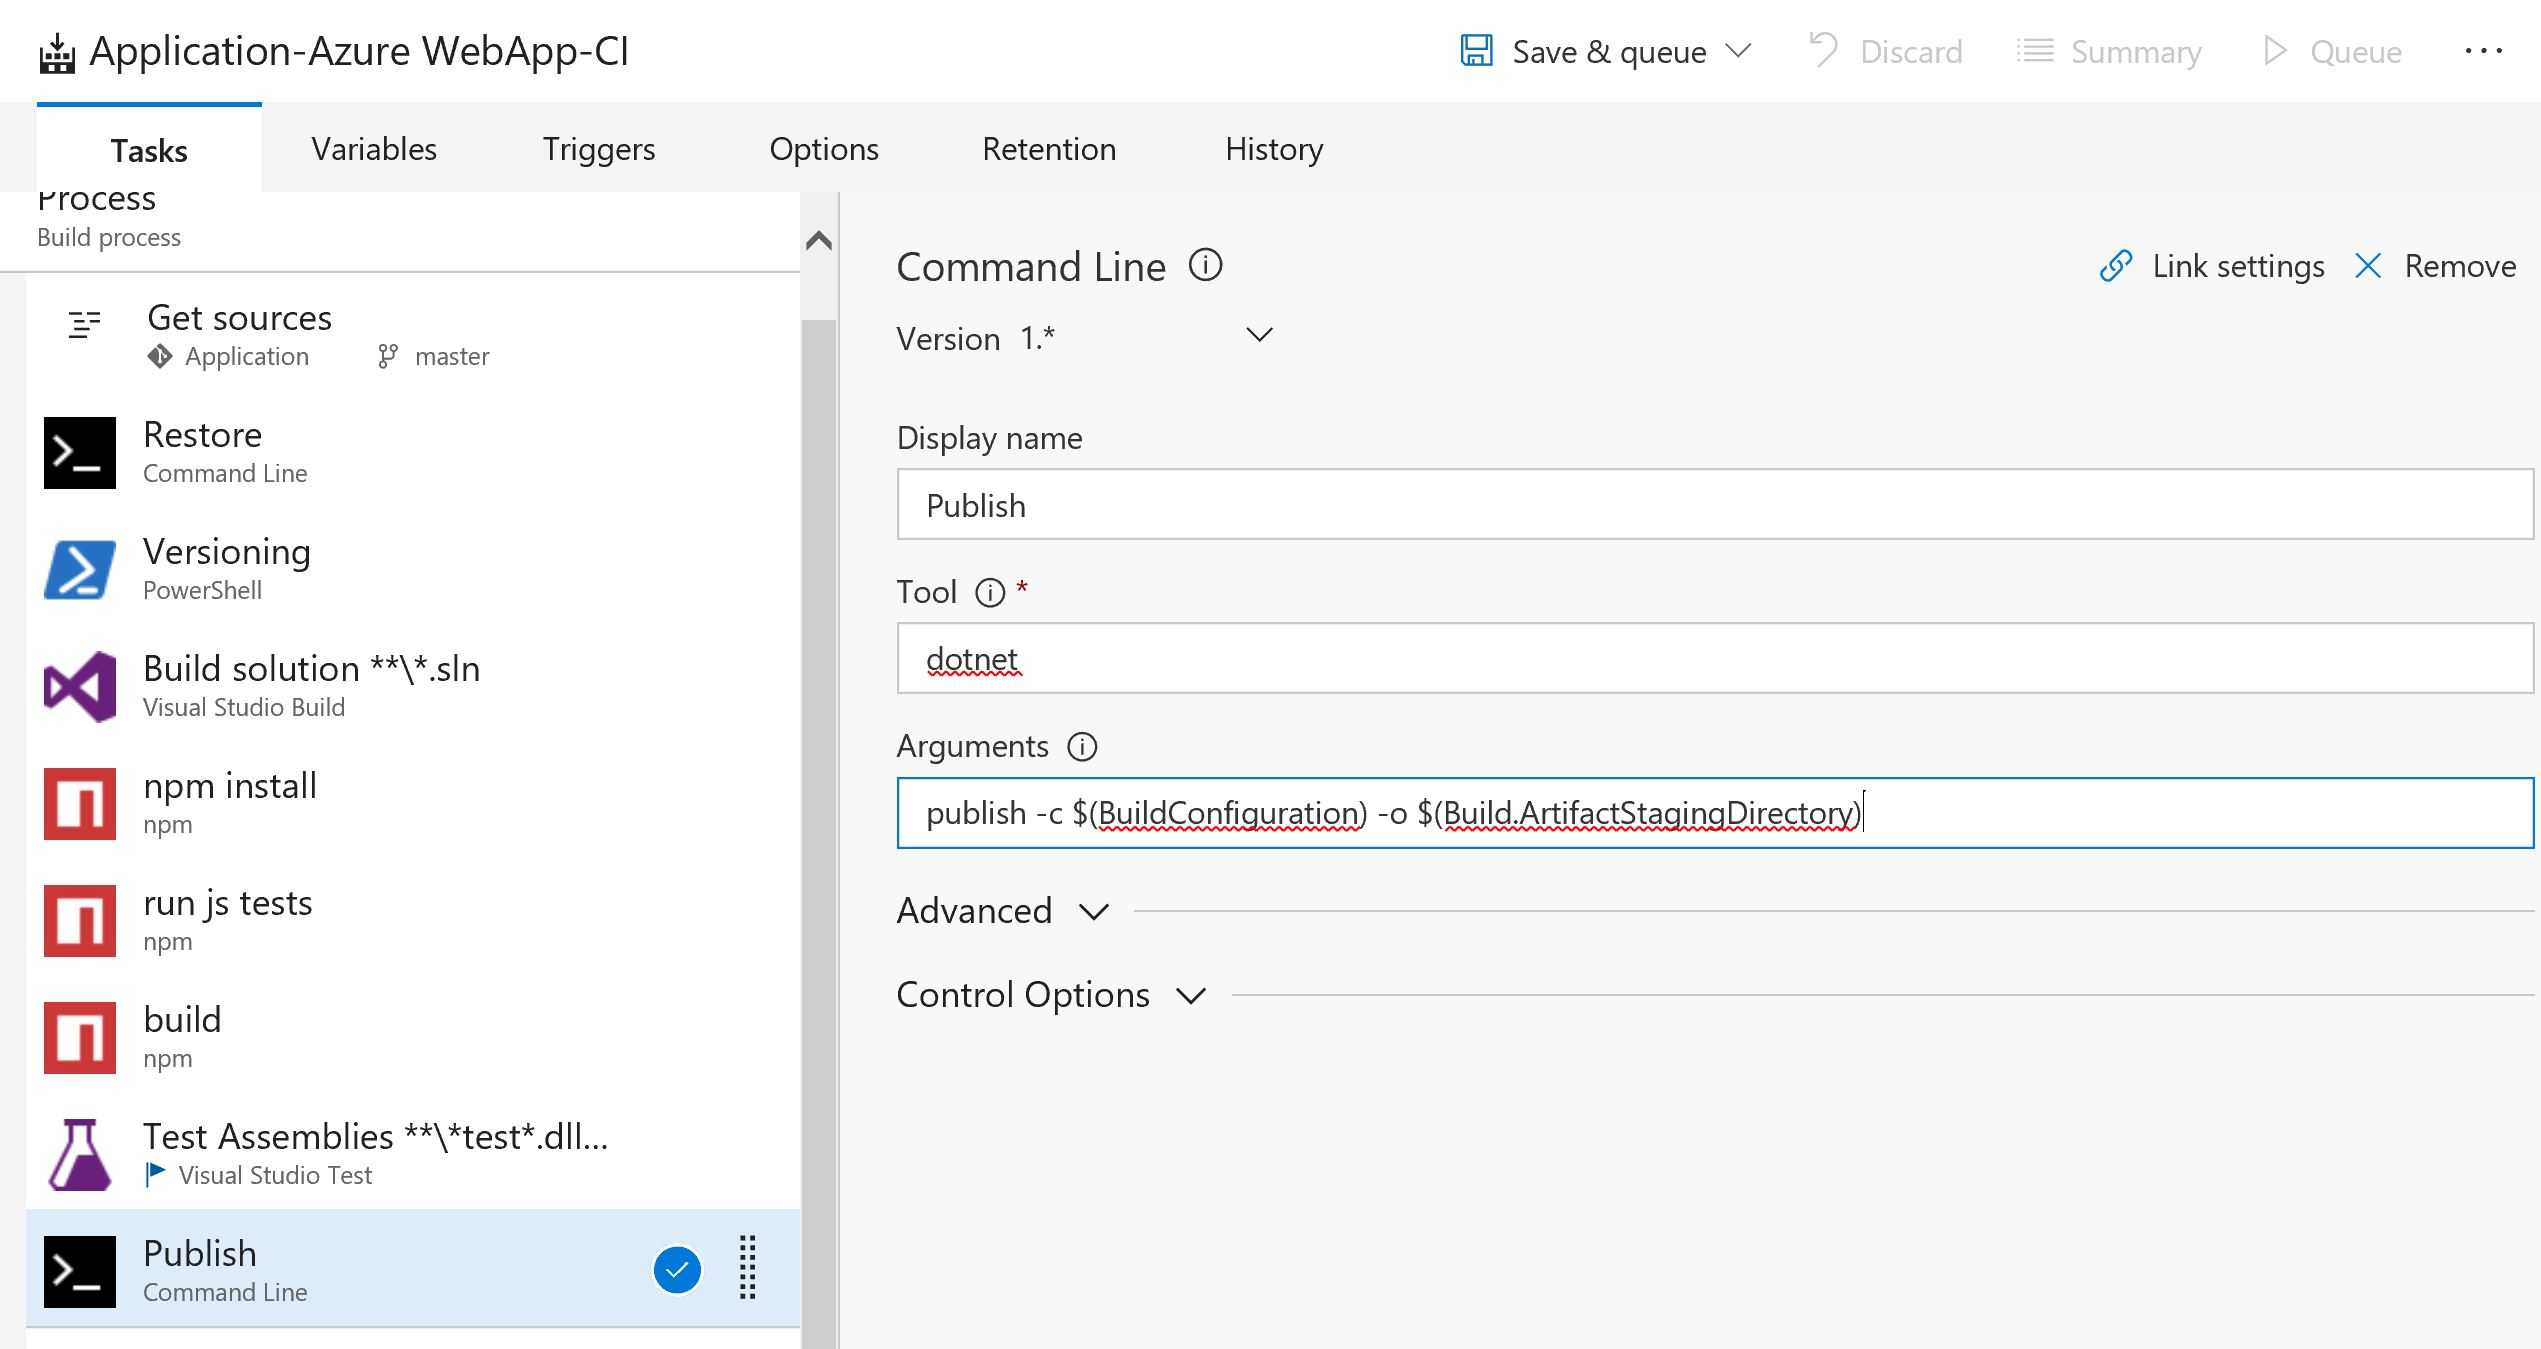
10. Publish the web project
Although these steps might seems a lot to do, they are pretty straight forward. Time to pack and create a publish artifact. First you will need to run dotnet publish from root of your ASP.Net Core app.
To do this you need a command line task. You can pass your build configuration and publish directory to this command as well. I’ve done this as build variables.
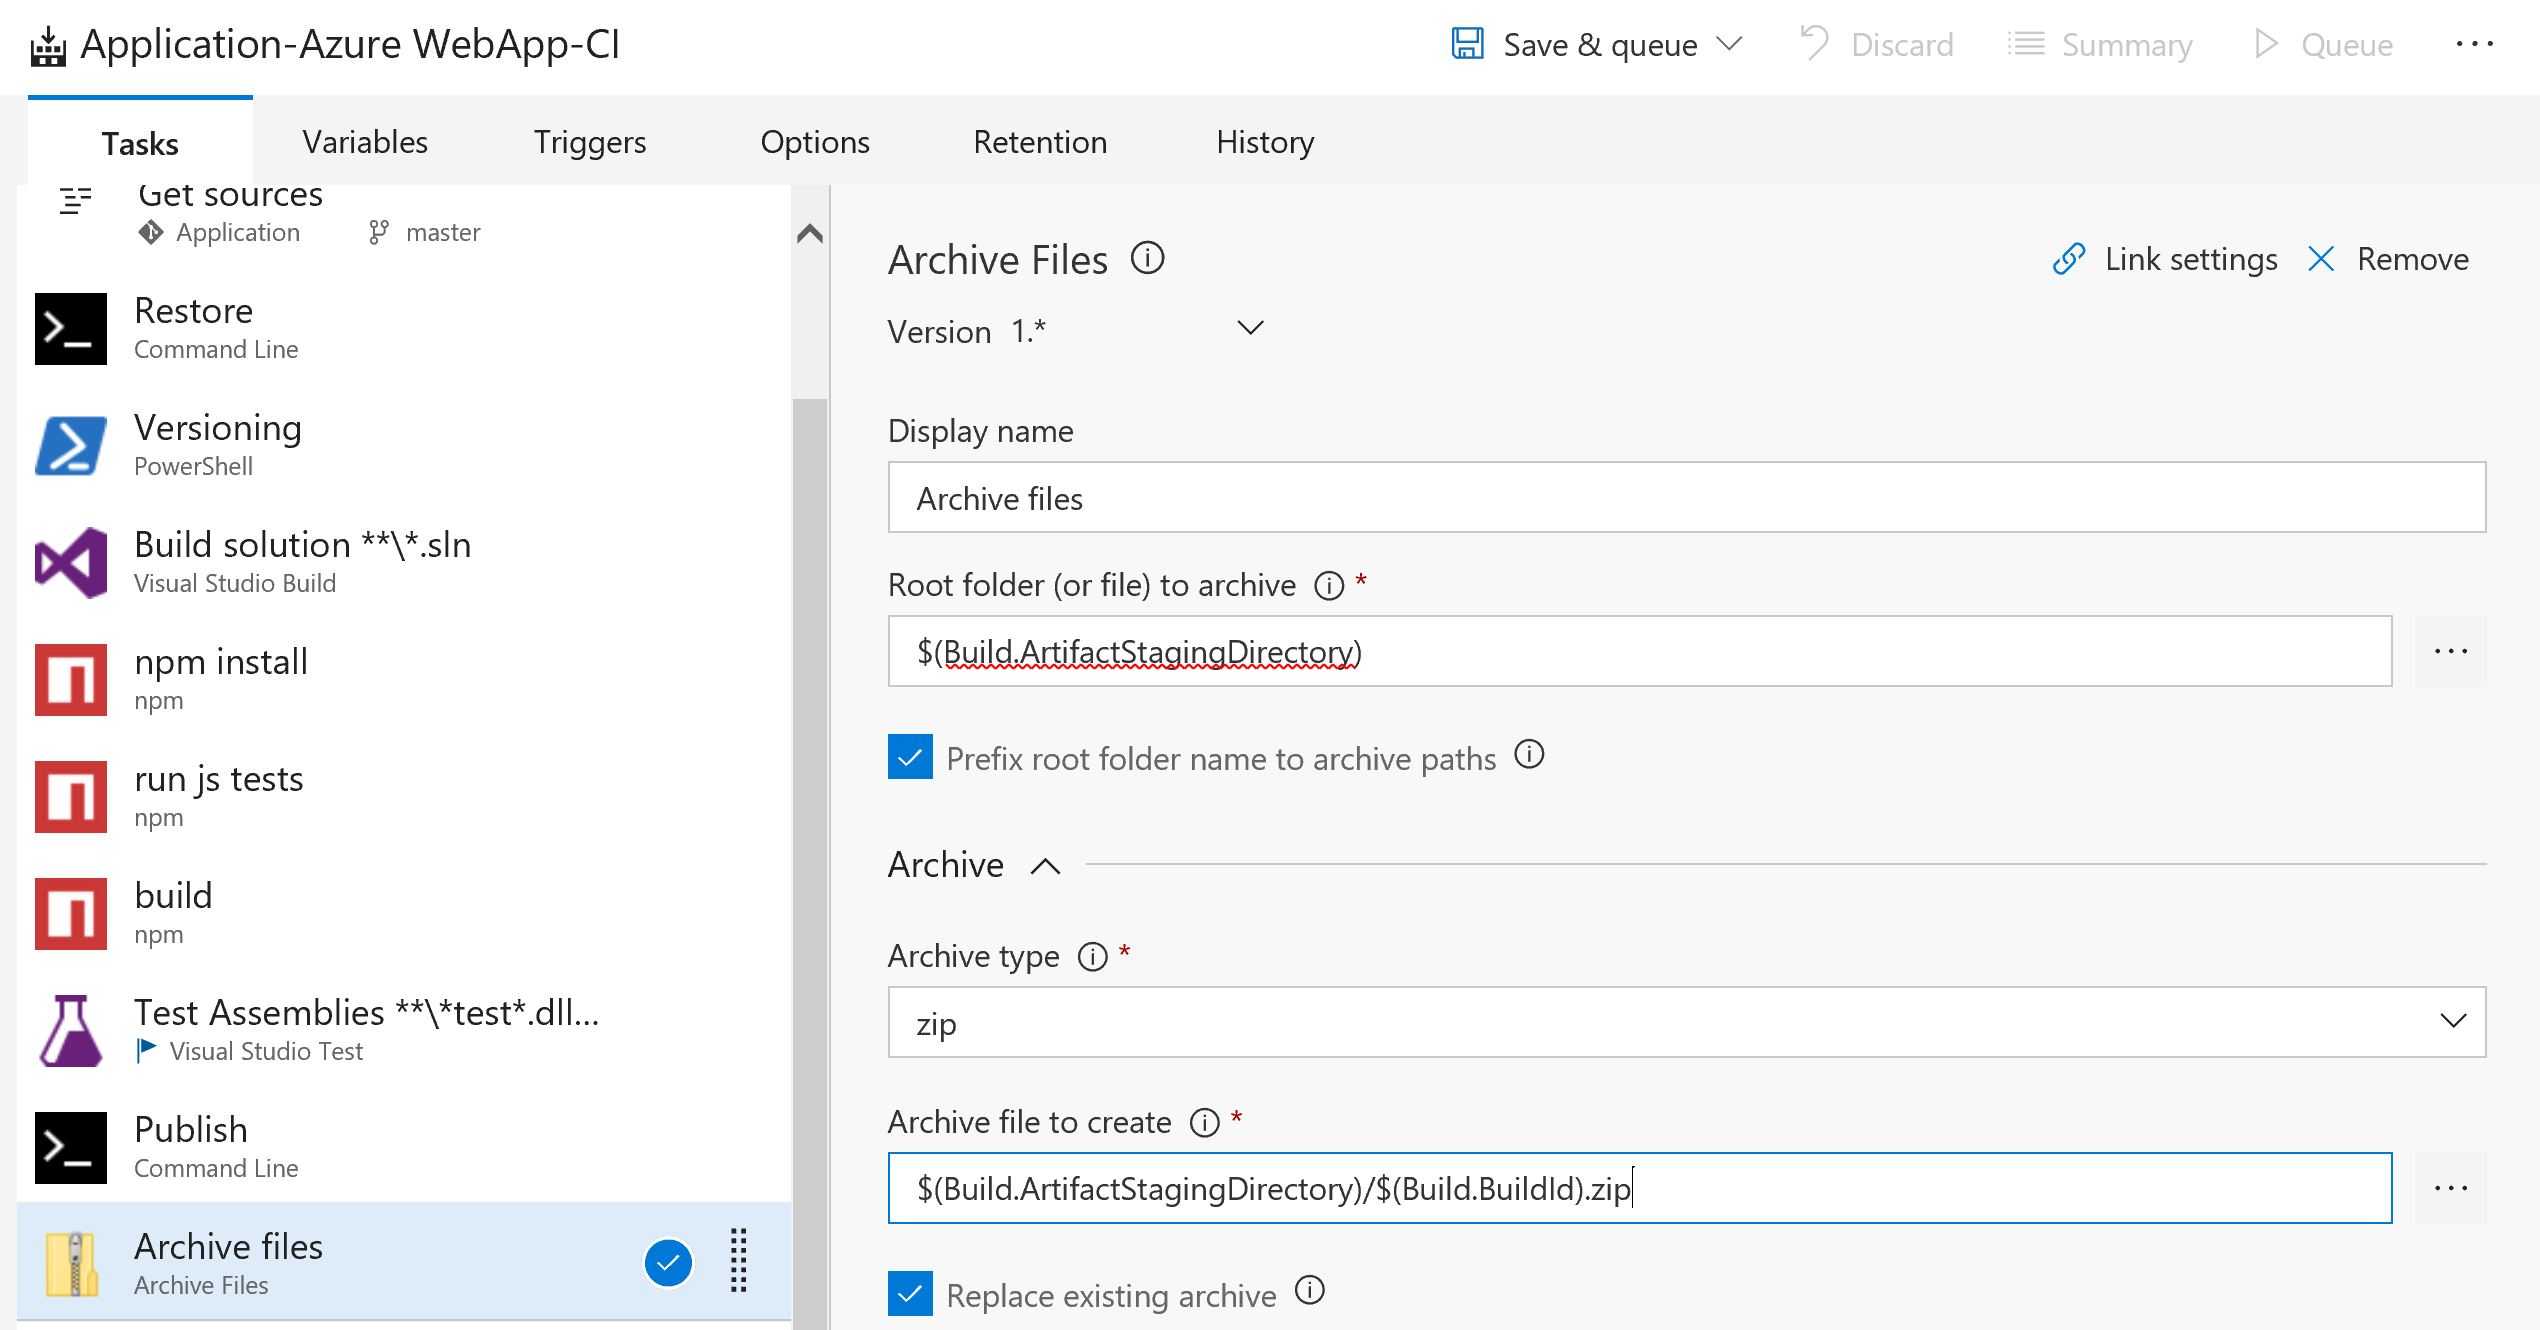
11. Archive the published output
The only remaining steps are archive the files and drop them in a folder so you can use it in release. For archive there is already a predefined task called Archive Files.
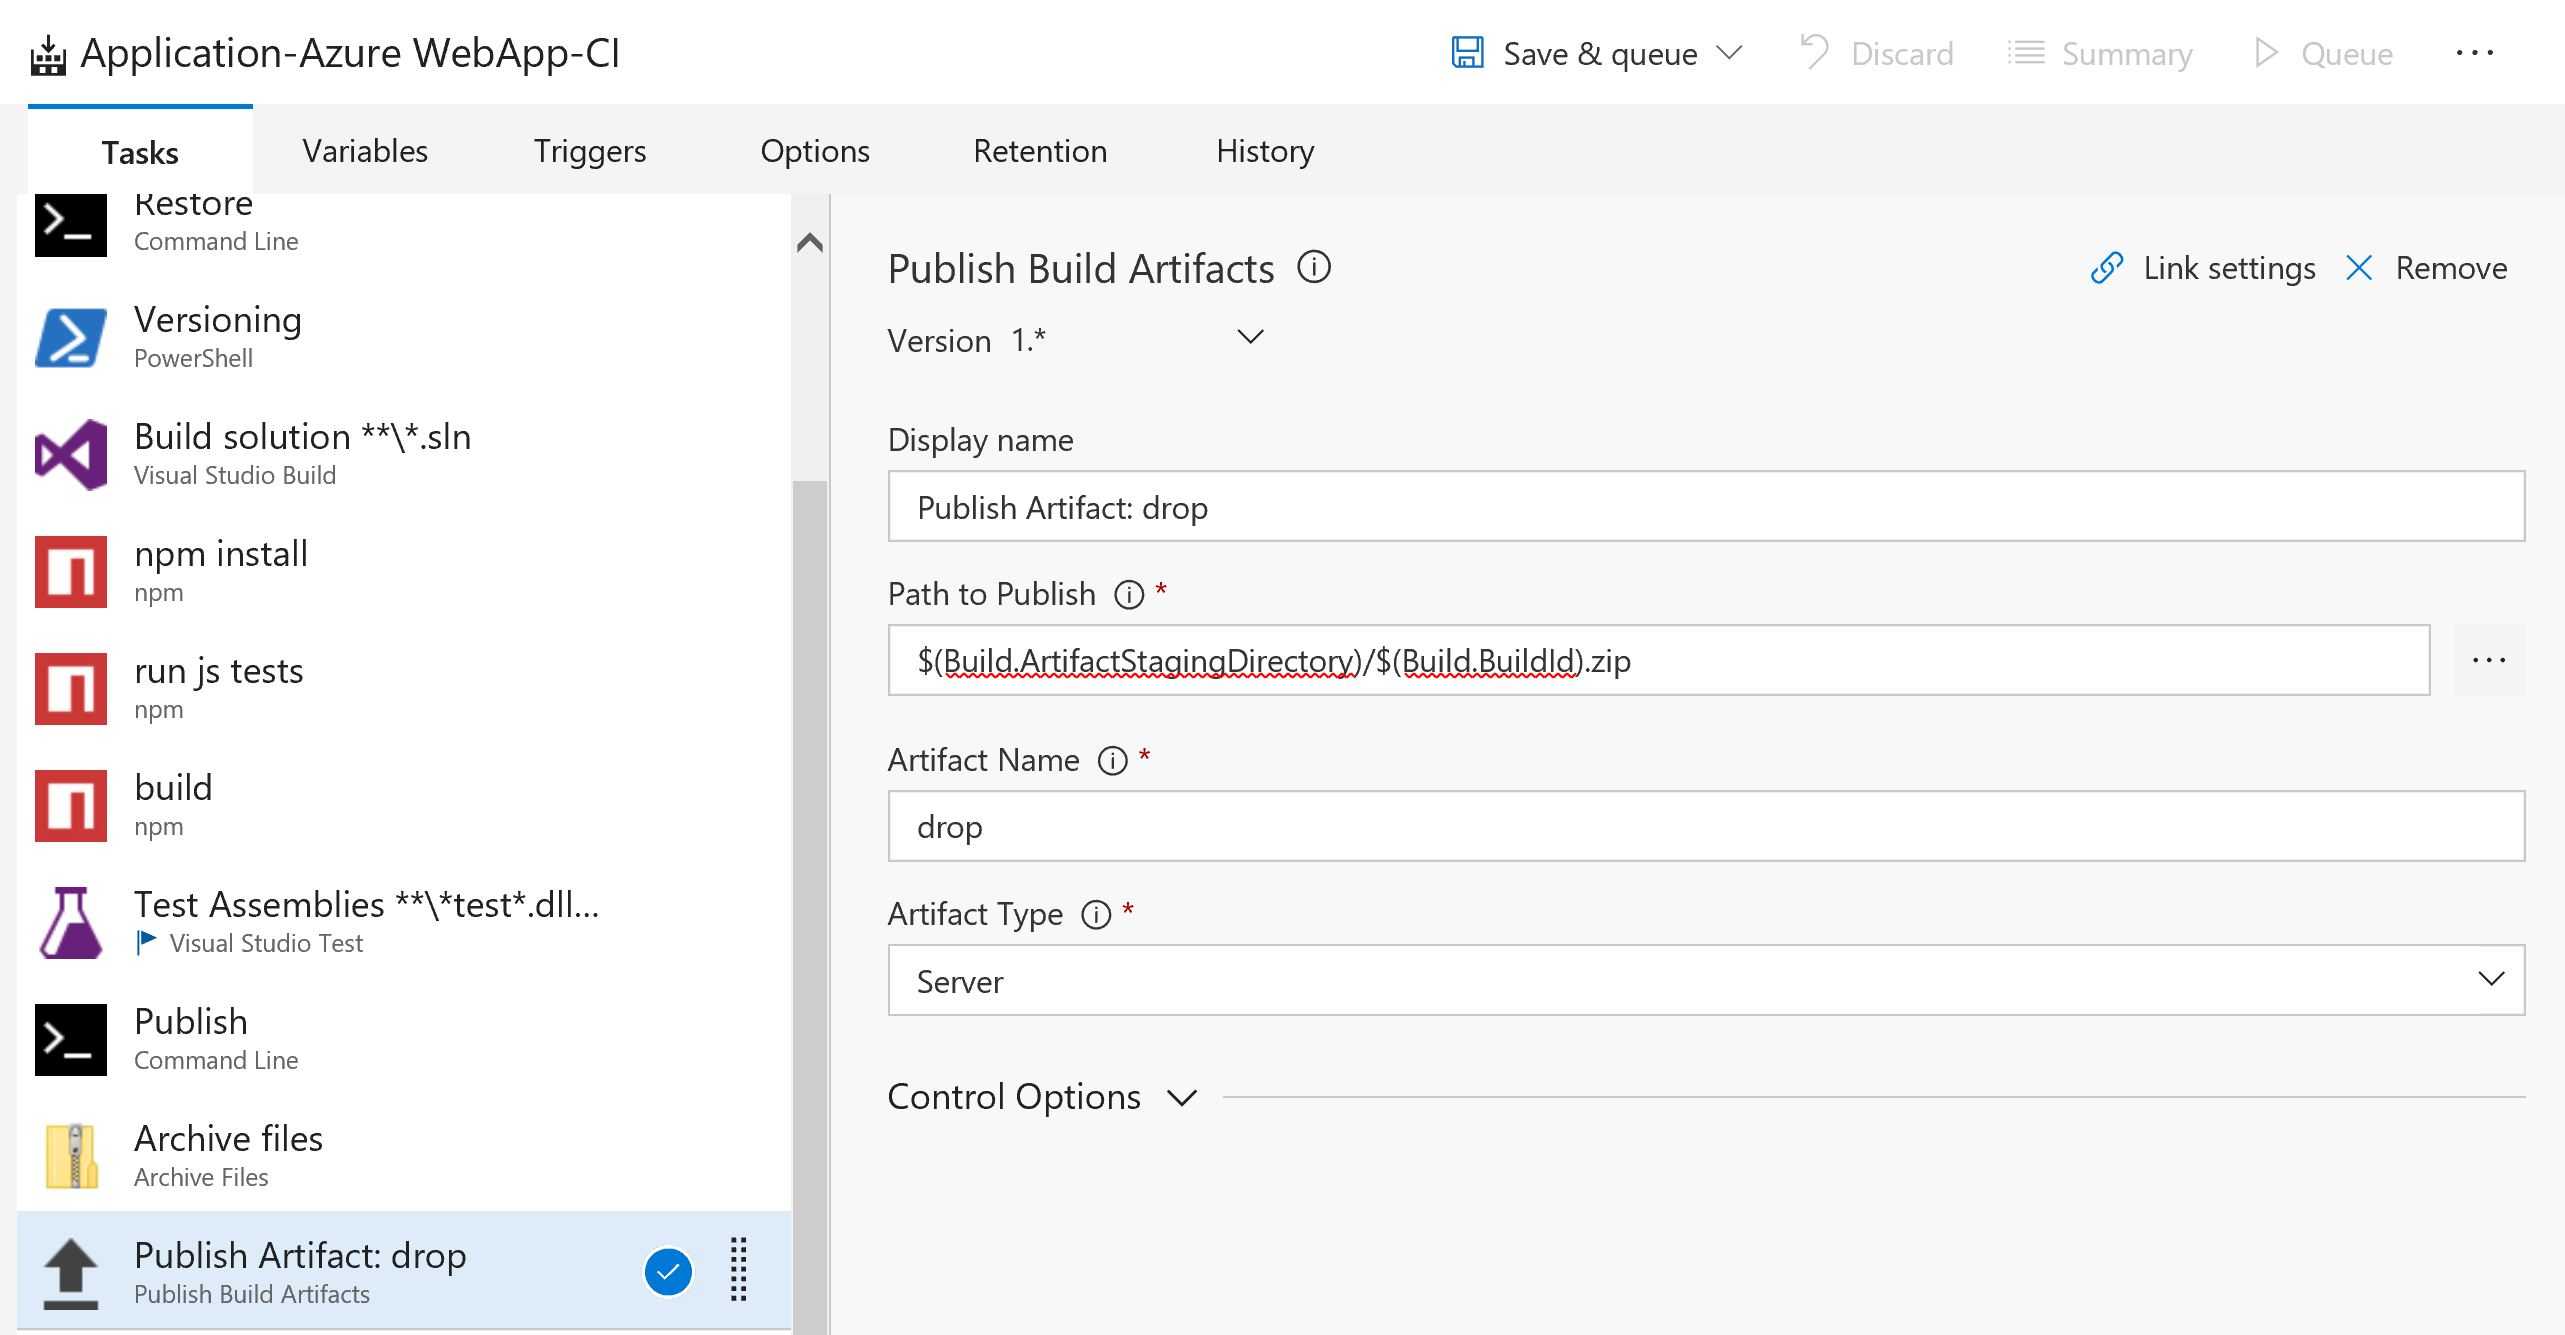
12. Publish the archived file
And at last you need to publish this artifact. Create a task called Publish Artifact and add drop to its name (for clarity). Then type your archive directory and name into correspondent boxes.
You will need to set the artifact type to Server which means it copies the file to the same build server.
Done. Now you can proceed with creating the release. I will explain that in my next post so keep an eye out.
Also any comment or improvements are very appreciated.
 Crypto