

State management in Vue.js
 November 18, 2019
 7 min read
Vue.js is an approachable, versatile, performant, and progressive framework to build user interfaces with. I’ve written three separate articles on it so far:
- A comprehensive intro to Vue.js
- Deliver a better user experience using Vue Router
- Form handling in Vue.js
We will be looking at state management in Vue.js this time which is the centre of communication in large applications.
Why do we need state management
When dealing with large applications, we definitely have to pass information between components. Shopping card needs to know whether the user is logged in or not, the search needs to get updated based on changes to filter data, and many more scenarios.
The usual ways of passing data such as props only gets us just that far. Things get complex when we want to pass the data in multiple layers of component hierarchy. Or even when we want to pass data into components outside of those hierarchies.
At the end of the day, it’s important to have a single source of truth and that’s what Vue is offering to solve using vuex. But consider using a state management library if:
- Multiple views may depend on the same piece of state.
- Actions from different views may need to mutate the same piece of state.
Vuex
vuex is an Elm-inspired state management library. It integrates really well into vue-devtools, providing zero-setup access to time travel debugging.
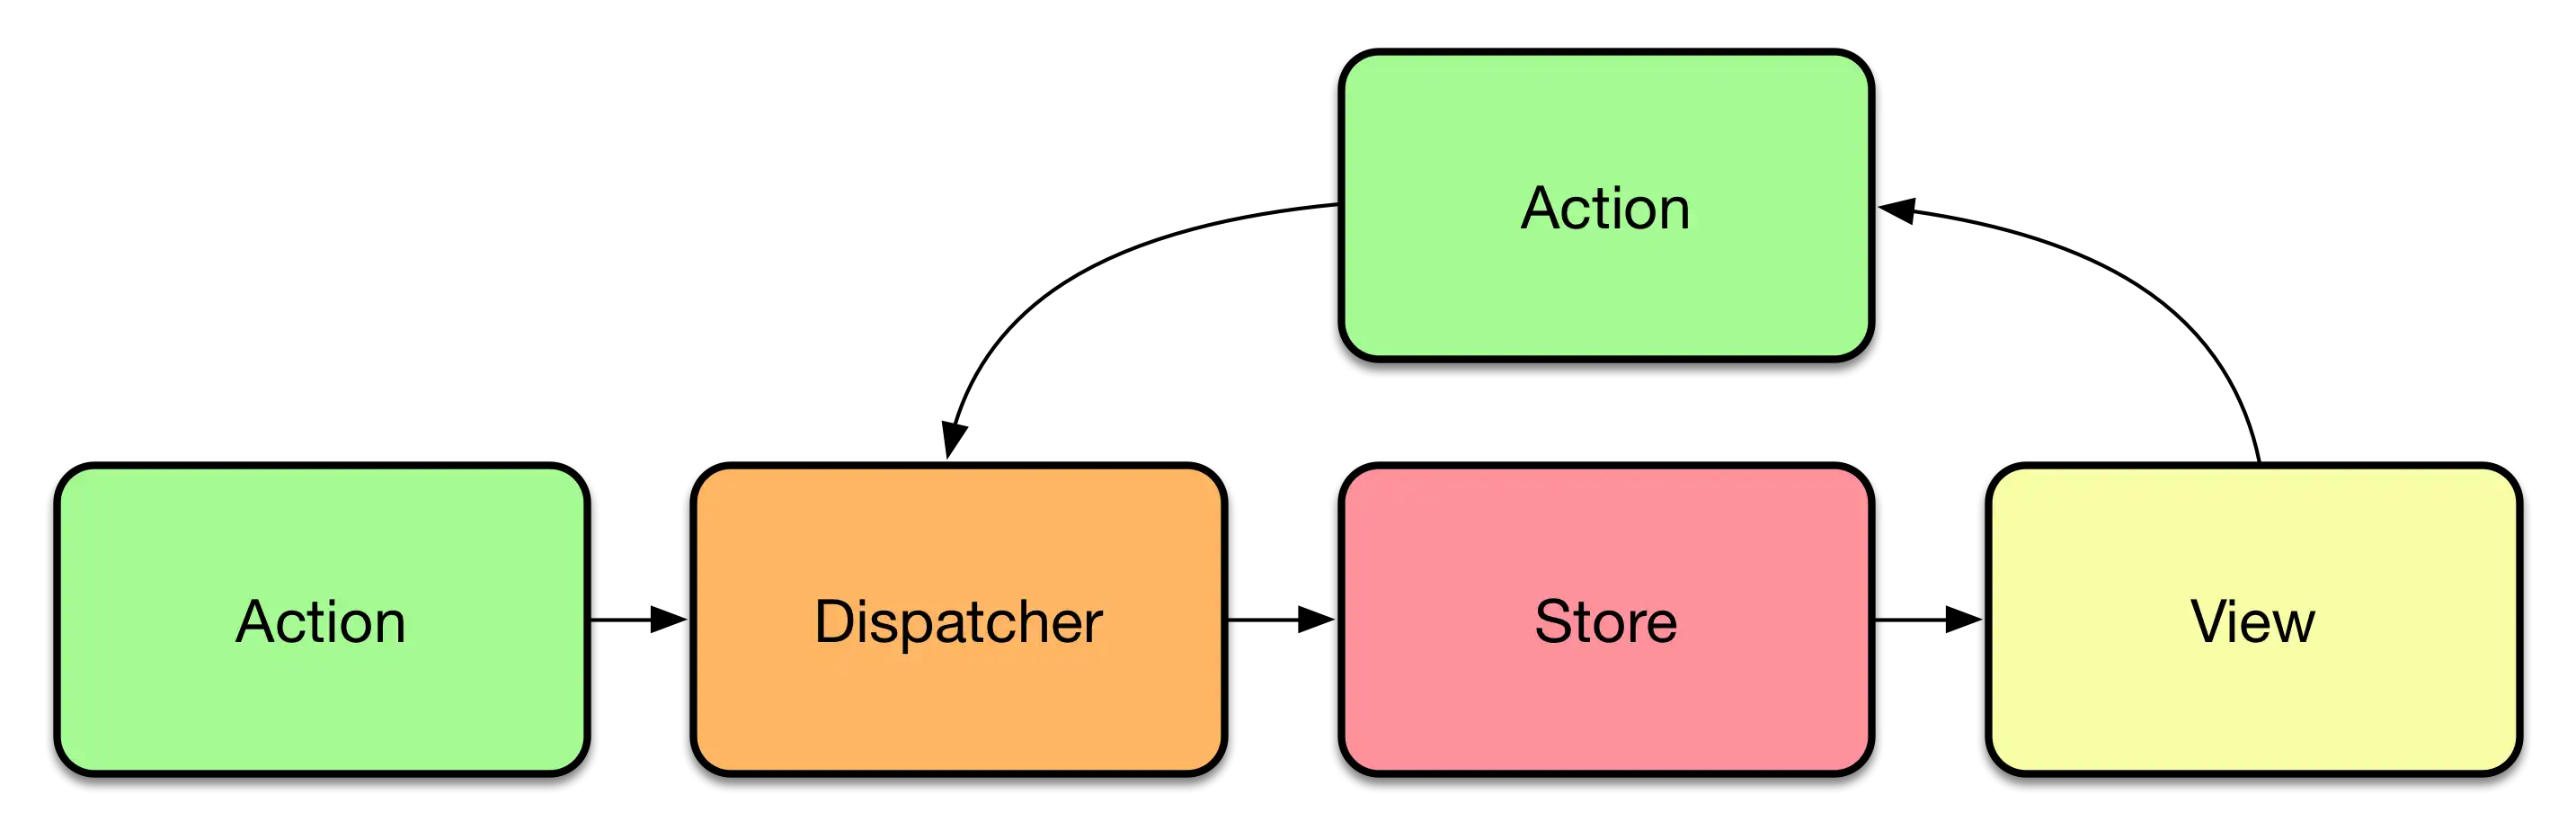
Vuex is based on Flux (a state management design pattern introduced by Facebook). The TLDR version looks like:
Installation
If you haven’t used Vue CLI to create your project, there are three steps you need to take:
Install the library:
npm install vuex --saveImport and wire it up:
import Vue from 'vue'
import Vuex from 'vuex'
Vue.use(Vuex)And last, because Vuex requires Promise you should include a package like es6-promise and import it before using Vuex:
npm install es6-promise --saveAnd:
import 'es6-promise/auto'Promise.Getting started
In its simplest form, you can use a centralised store as such:
const store = new Vuex.Store({
state: {
count: 0
},
mutations: {
increment (state) {
state.count++;
}
}
})Now, you can access the state object as store.state, and trigger a state change with the store.commit function:
console.log(store.state.count) // -> 0
store.commit('increment')
console.log(store.state.count) // -> 1Vuex state
This library uses a single state tree which ensures that the source of truth is always the state. However, this doesn’t have any conflicts with the modularity. We will have a look at the sub-modules later.
Vuex’s state consist of four objects, state, mutations, actions, and getters. So lets see what each of these are. But first, let’s see how we can use the store in our components. We use our previous students example from here on.
Including store in your components
Vuex provides a mechanism to inject the store into all child components from the root component with the store option which happens when you use Vue.use(Vuex):
import Vue from 'vue'
import Vuex from 'vuex'
Vue.use(Vuex)
const store = new Vuex.Store({
state: {
students: [
{
name: 'Yas',
age: 25
}
]
}
})
const app = new Vue({
el: '#app',
store
})This will allow you to access state using this.$store in any child component.
const Students = {
template: `
<ul>
<li v-for="student in students">{{ student.name }}</li>
</ul>`,
computed: {
students () {
return this.$store.state.students
}
}
}Note how I accessed the student in a computed property. This will ensure that we rerender the page whenever store changes.
How to use multiple properties from state
If you have to use multiple properties from store, Vuex offers the mapState helper method. Using this method you have the ability to map multiple properties from state to your computed properties:
import { mapState } from 'vuex';
export default {
name: "Students",
computed: mapState({
students: state => state.students,
teachers: state => state.teachers
})
};As you can see, you can use an arrow function to retrieve the state and access it’s properties. You can also define aliases to keep your code cleaner and avoid repeating state.property everywhere you want to use it.
If the local and store property names matches, you can skip the arrow function and just pass an array of property names you want to have:
import { mapState } from 'vuex';
export default {
name: "Students",
computed: mapState([
'students',
'teachers'
])
};If you have some local computed properties, you could use the spear operator to mix them with mapState:
import { mapState } from 'vuex'
export default {
// ...
computed: {
myLocalProp() {
return {
name: 'Yas'
}
},
...mapState({
numOfStudents: state => state.students.length,
students: state => state.students
})
}
}Getters
Sometimes you need to have derived properties based on store’s state. For example if you want to know how many students are older than 25. You can implement this in your component like so:
<template>
  <div>Total number of students aged 25 or older is {{numOfStudents}}</div>
</template>
<script>
import { mapState } from 'vuex'

export default {
  // ...
  computed: mapState({
    numOfStudents: state => state.students
      .filter(s => s.age > 24).length;
  })
}
</script>
But this means that if another component wants to have this logic, they need to duplicate the code. A better approach to these sorts of derived state is to use getters.
const store = new Vuex.Store({
  state: {
    students: [
      { id: 1, name: 'Yas', age: 26 }
    ]
  },
  getters: {
    numOf25OrOlderStudents: state => {
      return state.students
        .filter(s => s.age > 24).length;
    }
  }
})
These sort of properties appear under store.getters:
computed: {
  numOf25OrOlderStudents () {
    return this.$store.getters.numOf25OrOlderStudents
  }
}
Similar to mapState, you have mapGetter so you can get these properties easier:
computed: {

  ...mapGetters([
    'numOf25OrOlderStudents',
  ])
}
Mutations
A mutation is the only way you can change the state in Vuex. These mutations are basically events which have two properties:
- A string type
- A handler
You’ll perform the modifications inside the handler and it will receive the state as it’s first argument:
const store = new Vuex.Store({
  state: {
    students: [
      { id: 1, name: 'Yas', age: 26 }
    ]
  },
  mutations: {
    addStudent (state, student) {
      // mutate state
      state.students.push(student)
    }
  }
})
💡 You can’t call a mutation handler directly, instead, you will need to call
store.commitmethod.
const student = { id: 2, name: 'Alex', age: 23 }

store.commit('addStudent', student)
Like React Redux’s actions, it’s best to use constants for these mutation types:
// mutation-types.js
export const ADD_STUDENT_MUTATION = 'ADD_STUDENT'// store.js
import Vuex from 'vuex'
import { ADD_STUDENT_MUTATION } from './mutation-types'
const store = new Vuex.Store({
state: { ... },
mutations: {
[ADD_STUDENT_MUTATION] (state, student) {
state.students.push(student)
}
}
})The mutations should be synchronous. This is an important rule which you should adhere to so that Vuex can capture before and after mutation states. We will see how to have async state mutations using actions.
Actions
Actions are very similar to mutations, but there are two differences between the two. The first one is that instead of mutating the state themselves, they will commit mutations. And the second one is that actions can have asynchronous operations.
const store = new Vuex.Store({
  state: {
    students: [
      { id: 1, name: 'Yas', age: 26 }
    ]
  },
  mutations: {
    addStudent (state, student) {
      // mutate state
      state.students.push(student)
    }
  },
  actions: {
    addStudent (context, id) {
      const student = await apiService.get(id)

      context.commit('addStudent', student)
    }
  }
})
The first thing to note here is that actions won’t receive the store object, they will get a context object which exposes the same properties. We will see why when we review the modules. And the second one is that there is an asynchronous operation happening here.
You can use ES6 Object Destructuring to get only commit passed down to the action. This is useful if you have multiple commits in your actions because it will keep the code way less.
actions: {
    async addStudent ({ commit }, id) {
      const student = await apiService.get(id)

      commit('addStudent', student)
    }
  }
You can trigger an actions using store.dispatch method.
store.dispatch('addStudents', 2)Again, similar to mapState you have mapActions to be able to dispatch an action in your components instead of using this.$store.dispatch method which is way much cleaner. The difference is, you will call this in your method objects:
import { mapActions } from 'vuex'

export default {
  // ...
  methods: {
    ...mapActions([
      'addStudent', // map `this.addStudent()` to `this.$store.dispatch('addStudent')`

      // `mapActions` also supports payloads:
      'addStudent' // map `this.addStudent(id)` to `this.$store.dispatch('addStudent', id)`
    ]),
    ...mapActions({
      add: 'addStudent' // map `this.add()` to `this.$store.dispatch('addStudent')`
    })
  }
}
Modules
As we’ve seen so far, the state can easily get super big as the project grows. This can lead to multiple issues, but we can use modules to break this single state into multiple modules which have their own state, getters, mutations, actions, and guess what, sub modules 😍.
const studentStore = {
  state: { ... },
  mutations: { ... },
  actions: { ... },
  getters: { ... }
}

const teachersStore = {
  state: { ... },
  mutations: { ... },
  actions: { ... }
}

const store = new Vuex.Store({
  modules: {
    a: studentStore,
    b: teachersStore
  }
})

store.state.studentStore // -> `studentStore`'s state
store.state.teachersStore // -> `teachersStore`'s state
Inside the state and getters, the module’s state is passed down.
const studentStore = {
  state: { students: [] },
  mutations: {
    addStudent (state, student) {
      // `state` is the local module state
      state.students.push(student)
    }
  },

  getters: {
    count (state) {
      return state.students.length
    }
  }
}
However, inside the actions, you can access the global store from context via context.rootStore:
const moduleA = {
  // ...
  actions: {
    async addStudentIfRegistrationOpen ({ commit, rootState }, id) {
      if (rootState.registrationOpen) {
        const student = await apiService.get(id)

        commit('addStudent', student)
      }
    }
  }
}
💡 By default the
getters,mutations, andactionsare registered on the global namespace. This will allow multiple modules to react to same mutation or action if they want to. You can use thenamespaced: trueflag on the module to make it self contained.
You can find out more about the modules in the official documentation.
Summary
Alrighty, you now know enough about state management in Vue using Vuex to start using it. But beware that there are many other little tips and tricks where I thought would fall outside of a single article which you should look into. For now enjoy playing with this amazing library and get your hands wet.
PS: if you want a head start, use this GitHub repository and create a code sandbox out of it. It contains basic setup and modules as well.
 Crypto